Ein leckeres Dessert ohne Backen. Bananen, Vanillepudding und Kekse bilden die richtige Kombination für kleine und große Naschkatzen.
ZUTATEN
Puddingpulver in wenig Milch anrühren. Den Rest der Milch erhitzen. Wenn sie kocht, das angerührte Puddingpulver sowie die Erdnussbutter (kann weggelassen werden) dazugeben und zu einem dicken Pudding aufkochen.
Eine kleine Backform mit Butterkeksen auslegen, darauf die Pudding-Sahne-Creme streichen, mit Bananenscheiben belegen, noch eine Schicht Butterkekse darauf geben, darauf die restliche Creme verstreichen, Bananenscheiben darauf legen und als Letztes noch Butterkekse darauf legen. Nun die Schokocreme darauf verteilen. Sie wird folgendermaßen zubereitet:
Schokolade im Wasserbad oder in der Mikrowelle schmelzen und etwas abkühlen lassen. Dann wird sie mit Puderzucker, Butter und Vanilleextrakt verrührt. Zum Schluss Milch unterrühren. Das Ganze zu einer cremigen Masse rühren. Falls die Creme zu dick ist, etwas mehr Milch dazugeben, aber vorsichtig.
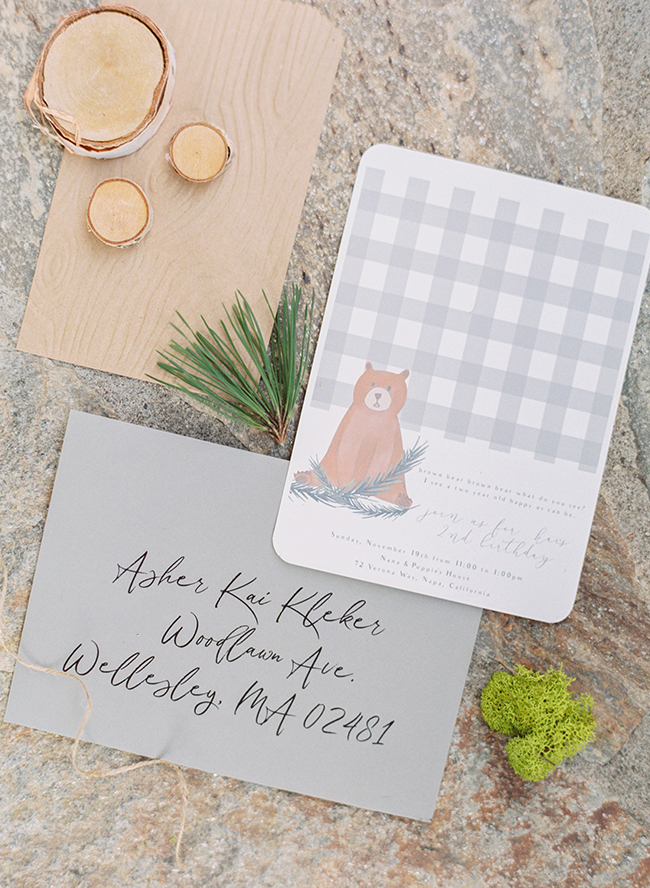
This two year old’s birthday bash couldn’t be cuter, or chicer, honestly! His mama, Jackie of Finding Lovely, took a modern, neutral approach to baby’s favorite book with this woodsy Brown Bear birthday party. And boy! Did it turn out great! It’s fun for kids with chocolate milk, yard games, coloring placemats and cutesy desserts. And fun for parents for all the same reasons, plus party favors and pretty decor. We’re sure the adorable theme will inspire many more kids’ (or grown ups’!) parties!
Jackie says, Our little boy has a late fall birthday and loves Brown Bear Brown Bear by Eric Carle. So, when I started planning his 2nd birthday party I knew I wanted a woodsy, outdoor feel inspired by his favorite book. But not wanting to go with the bold colors Eric Carle is known for, I decided to stick to a neutral color palate of soft grey, pops of evergreen and natural woods, more appropriate to the season – Brown Bear Brown Bear au naturale.
Miss Nibbits did a beautiful job with the custom invitations and signage complete with watercolor bears and paw prints. The grey check pattern on the invitation carried over to to the beautiful dessert table check tablecloth and hand-painted onto the cookies by KessaCakes.
My favorite project for the party was the birch frame above the dessert table made of gathered white birch branches. The ends were wrapped with twine and wired on evergreen clippings from the backyard. It added impact for little cost! The cake itself was made by WholeFoods but I fully decorated it at home with natural wood trees, wood slices and evergreen clippings.
There were many little details throughout the party that brought it together; from homemade woodland treats to the kid’s table made extra special with bear-themed coloring pages and bundles of crayons. And also… the favors table where adults got to take home honey jars and the kiddos got to pick a bear-themed book, to getting to sip chocolate milk in bear bottles. The whole day was lovely, filled with dear ones, and captured beautifully by Emily March Photography. A day we won’t soon forget, especially since the birthday boy keeps singing himself happy birthday, Every. Single. Day since!
I was thinking of going into some long winding apology about life and what kept me back from writing a post for the past three months - but well you know the drill - WAHMMY duties was what it was all about. :)
Anyyywaayyys, my daughter's fourth birthday party is just a couple of months away and I have done close to nothing. I bought her a birthday dress. Haha. Oh and I do have a theme and some printables already - it's going to be just an intimate house party (finally.). Due to budget constraints (big school's up for my little girl in June), everything is kinda a gray area right now as far as her party is concerned, but what I'm sure of is she can have a little celebration at home. So I thought, I'm going to give myself a challenge this year - I will plan the entire fab little celebration in two to three weeks at most. Can I do this? Hmmm, we'll find out by May.
In the meantime, as I lament my woes, I've gathered some awesome ideas for party backdrops from the web. For the past few year that I've been looking into kiddie party ideas in the Philippines, most backdrops I have seen were made of either a tarpaulin print-out or the more expensive styro set-up.
While the 'traditional' backdrops are of course the easiest choices, moms who want a different look and feel for their little one's parties are always on the lookout for other backdrop options. Here are some fun, DIY backdrops you can put up for your celebrations:
PAPER AND RIBBONS
photo from this blog:http://blog.hwtm.com
Paper and ribbons - easy-peasy! Yeah I know, most DIY back drops look 'easy-to-do', but turn out to be Herculean tasks. But this particular one - nah. Materials required are scrapbook board paper, ribbons, mounting tape, and foam board. You can actually even ditch the foam board (like what was done in the photo below), and just hang the backdrop. Replace the scrapbook papers with actual photos of the birthday celebrator for a more 'personal' feel. Pretty neat right?
Photo credit to: http://jp8.r0tt.com
FABRIC BACKDROPS
Had the ultimate 'Of course!' moment when I saw this backdrop idea. Quilts and fabric are like the easiest to have for dessert or candy buffets. It can even be used for DIY photobooths! You can go for printed ones if you are just too busy to jazz it up. Or you can go for plain ones (or simply striped or polka-dotted) if you are in the mood to add more elements to it. You can easily personalize this kind of backdrop (if you want) with the celebrant's name, or add DIY banners too.
Just look at this beautiful fabric backdrop bordered with pink tulle - whimsically pretty right?
Once you're done with the party, you can even use your colorful fabric backdrop as a quilt, a bed cover, table cover, or even as pillow cases! :)
Photo from: lesliesgoodreport.blogspot.com
PAPER MEDALLIONS/PAPER PINWHEELS
Paper is such a lovely medium, and it's also such a versatile material to use as backdrop. I've tried making these paper medallions two Christmases ago, and they're so easy to put together! In my experience, the best material to use is your common cartolina, pliant enough for accordion folding, yet thick and sturdy enough to hold its own. Plus it's so inexpensive. :) You can also go for scrapbook paper if you want to go for prints, or combine cartolina with printed wrapping paper - the options are endless!
Paper medallions used as a backdrop provide maximum impact when you put a lot of them together, like in the photo below. But, a few well-made, well-thought of ones, placed in interesting, contrasting texture, also make a stand-out unique party backdrop.
Photo from amorologyweddings
Photo from ruffledblog.com
Want to make one for your party? You can check out a tutorial from A Blissful Nest here.
RIBBONS
Ribbons, with its wide array of colors, prints, and textures also make for an interesting and extraordinary backdrop. Hang them all together from a line like a curtain, twist them for more texture, or combine them with other backdrop accents and you're sure to have a conversation piece that guests will definitely want photos of.
They're also quite easy to put up. All you need is a string, your preferred ribbons, and a tube to hang them from. It's best if your ribbon backdrop measures the same as the length of your table (if you plan to use it for a dessert or candy buffet). Contrasting colors would also make it more eye-catching, and with a dash of prints here and there, you'll really have something truly special.
Grand ribbon backdrop. Photo from Pinterest.
Have some extra fabric with nice prints at home? Why don't let them go to waste! You can also use them like ribbons for your backdrop.
Fabric ribbons were used as backdrop. Photo from 100layercake.com
See? It's not really hard to give your party a different look - DIY backdrops can give it that instant makeover. And you don't have to spend as much too! For most of the options presented above, you can actually find the basic materials just lying around at home. :)
Will definitely post additional ideas as I discover more. Here's to hoping I get to update Kiddie Partyholic more regularly from this point forward. :)
Lately because of all the snow my little one has been home with me more than normal. Don’t get me wrong, I love spending time with that little girl, but trying to find something for her to eat for lunch besides a sandwich can prove difficult when I’m still trying to get some work done. Recently our family has started doing Weight Watchers so I wanted to make sure I could make something for lunch that we would both enjoy, but not undo our day. Mac and Cheese is my daughters favorite thing to have no matter the time of day so I went in search of a Weight Watchers Mac and Cheese Recipe and found one that was easy to make and tastes exactly like “normal” Mac and Cheese. Your kids will love it and at only 4 Weight Watchers Points you will too! You can also make some Weight Watchers Berry Cobbler Cake to serve as a treat.
And since I’m loving my pressure cooker these days, I decided to make my Power Pressure Cooker XL version of my Weight Watchers Mac and Cheese Recipe. The result is amazing! This Pressure Cooker Macaroni and Cheese Recipe is my new comfort food. The macaroni is perfectly cooked and is so flavorful.
Weight Watcher’s Pressure Cooker Macaroni and Cheese Recipe
First, Cook your noodles according to package directions and drain.
Next, Return your noodles to the pot and add in your milk, cheese soup, and water. Stir well and bring to a boil, once boiling lower heat and let simmer about 5 minutes or until thick and creamy.
Last, spoon into serving bowls (1 cup per serving) and top with a little salt and pepper and a small pinch of cheddar cheese (if you would like!) and serve.
That’s it! About 10 minutes to make this amazing Weight Watchers Macaroni and Cheese Recipe. Your kids will never know the difference!
Must Have Weight Watchers Diet Tools
Looking for more great Weight Watchers Recipes? Check out these Weight Watchers cookbooks
Weight Watchers 2018: Get Ready For 2018 With The Complete Smart Points Guide to A Permanent Weight Lost Include 90 Day Meal Plan
WEIGHT WATCHERS: Slow Cooker Smart Points Cookbook, Discover Rapid & Healthy Weight Loss, “Set & Forget” To Lose Fat Fast The Natural Way
Weight Watchers Instant Pot Smart Points Cookbook: The Complete Weight Watchers Instant Pot Cookbook – with 60 Healthy & Delicious Instant Pot Cooker Recipes
Get some ready Weight Watchers food and drinks
Also try our other Weight Watchers Recipes
Weight Watchers Online
4.5 from 2 reviews
Ingredients
1½ cups uncooked macaroni noodles
1 can Low-Fat Cheese Soup
½ Can Water
¾ cup Low Fat Milk
Instructions
First, Cook your noodles according to package directions and drain.
Next, Return your noodles to the pot and add in your milk, cheese soup, and water. Stir well and bring to a boil, once boiling lower heat and let simmer about 5 minutes or until thick and creamy.
Last, spoon into serving bowls (1 cup per serving) and top with a little salt and pepper and a small pinch of cheddar cheese (if you would like!) and serve.
Pressure Cooker Macaroni and Cheese Recipe
Place a TBS of Olive oil in the bottom of your Pressure Cooker XL.
Then hit the rice risotto button.
Next, add in the rest of the recipe ingredients.
Then press cancel and leave the pasta in the pot for ten minutes (Do in different color font).
Once you have hit cancel then close the Pressure Cooker XL.
Hit the rice risotto button again it will stay at 6 minutes.
Then once it is done use your mitts (insert link) and let the steam evaporate.
Stir the mac and cheese.
Place it in a bowl and enjoy this pressure cooker mac and cheese.
When I am trying to do an entire meal at once I love thisStackable Basket
and everyone needs one of these make sure you look at the size of the unit before you buy this cake pan.
This is the best storage option I love my Rubbermaid containers you can microwave them and refrigerator food in them. They do not stain!
You need this Silicon Lifter or your foil sling. You can put your Spring pan on the sling or foil and once the pressure cooker is done cooking release the pressure using your mitts
For more instant pot recipes check out these cookbooks
Happy Weekend to all of you! I this finds you at the end of another great week and heading into a fun fall weekend. Today's Weekend Company recipe couldn't be more perfect because we're heading out to our favorite fall festival today, The Apple Festival. We're ready for hot apple cider, warm apple fritters, hay rides, crafts and more!
I can't even put into words how excited I am to have my guest join me in the kitchen today. Back in June 2011 when I was expanding the blog and creating my Facebook Fan page, she was one of the first bloggers to welcome me into the foodie world, and even invited me to do my very first guest post on her site. Then as we talked more and more we discovered we might have just been separated at birth! We both focus on family style cooking, are both wives and mothers to one child, both boys...both named Alex! She is a dear sweet friend whom I respect so much and am so honored to have in my life. Ya'll know her as The Country Cook, so please welcome, for the first of what I hope is many times, Brandie to EMM~
First, let me say a special thank you to the lovely Krista for inviting me here today! I just love so many of Krista's recipes and she is such a sweet gal! I'm so thrilled to be here and to be sharing a favorite recipe of mine.
For those of you who are new to my site, let me introduce myself. My name is Brandie and I publish TheCountryCook.net, a website dedicated to classic American recipes and quick and easy family favorites. I'm also a momma and a wife. I understand the challenges of today's busy families and I try to share many recipes that use readily available ingredients and are easy to prepare so families have more time to enjoy each other (and a tasty meal) together at the supper table.
I am so glad Krista invited me to share a recipe during the fall season. There are just so many wonderful recipes I like to make this time of year. One of my favorites (and of course, easy!) recipes to make are these Apple Dumplings.
For this recipe, you only need one apple for 4 servings or two apples for 8 servings. And the crescent rolls take on a whole other flavor when combined with the cinnamon and butter. And like many good desserts, a little bit of soda really makes this dish come together. No one would ever guess you used crescent rolls to make these dumplings. My family just loves this dessert because they love apples and I love it because it is easy peasy!
Ingredients:
1 Green Apple (Granny Smith or Golden Delicious)
1 tube (8 oz.) Crescent Rolls
1 stick unsalted butter, melted
3/4 cup sugar
1/2 teaspoon vanilla extract
Ground Cinnamon (to taste)
1/2 cup lemon lime soda (Sprite or Mountain Dew work good)
Directions:
Preheat oven to 350F degrees
Peel and core apples. Cut apple into 8 slices.
Unroll tube of crescent rolls and separate into 8 pieces.
On each roll, sprinkle with a bit of cinnamon.
Add one apple slice.
Roll it up in a nice little bundle. Continue with next 7 rolls the same way.
Spray an 8-inch square pan with nonstick spray.
Place all 8 dumplings into baking dish.
Mix together melted butter with sugar and vanilla.
Pour butter mixture on top of crescent rolls.
Now take soda and pour it around the edges of the crescent rolls.
Sprinkle tops with a bit more cinnamon.
Bake in preheated oven for about 35-40 minutes.
Serve with whipped cream or ice cream.
Cook's Notes: Just double the recipe and use a 13x9 pan for 8 servings.
Vegan cheeses all suck, right? They don’t melt. They taste horrible. Ummmm…. No! Today I’m sharing the best of the best out there & these vegan cheeses will convert even the most hard-core cheese lovers. Trust me, I’m a reformed dairy lover converted over to the favorites I’ve named below & I’m not sad at all!
Now this has been a 3 year journey of many, and I mean MANY, sub-par even disgusting (actually making me sick), pathetic excuses for “vegan cheeses”. Each of these named below are staples in our kitchen & we use them for grilled cheese sandwiches, pizza and lasagna or stuffed shell recipes. I’m going to share my tips and tricks for the ooey gooey cheeses below that will have you swoon.
All of these vegan cheeses can be purchased at Whole Foods or your local grocery store. I do, on occasion, special order from local markets if I can’t find this or that but everyone accommodates.
I want to begin by talking about spreadable cheeses – think cheese and cracker platter. I’m a huge fan of any and all Miyoko’s cheeses/butter. Spreadable and mozz for pizza. I’ve highlighted a few above but all of their products are AHHHHHH-mazing! I’m a huge fan of the winter truffle, double cream and black ash. They’re so good that we had a variety of these cheeses out on our appetizer buffet over the holidays and these were the cheeses that everyone complimented/devoured. Little did they know they were vegan.
Tree line is very similar to a Boursin style spreadable cheese. Yet another nut based cheese that I have a puffy heart for all of the flavors. Perfect spread on crusty bread or your favorite crackers.
Grilled cheese/Quesadillas. My daughter is a huge fan! 2 favorites are Follow Your Heart Pepper Jack. While cooking, cover the pan over low heat to allow the cheese to melt and always use cheese that has sat out at room temperature to warm up. Melts perfectly every time. The other favorite is Field Roast Chao slices. Again, let sit out at room temperature for about 15 minutes then cover while cooking. Heavenly.
Other insanely awesome cheeses to note. Follow Your Heart shredded mozzarella and parm is incredible on pizza or lasagna. I’ll be sharing recipes this week for an incredible lasagna I made with both cheeses. The flavor right out of the package was incredible and if you’ve tried vegan cheeses… you know this is rare! They melt, have a great depth of flavor. Seriously, who misses dairy any ways. NOT me!
Last but very much NOT least… Kite Hill. Oh Kite Hill, how do I love thee. The ricotta is so incredible and versatile. I’ve used it in dessert seen here . I’ve used it lasagna (recipe coming this week). So versatile and incredible flavor. I order this by the case and I’m not lying! I also wanted to share their cream cheese that we love as well. This chive cream cheese is virtually indiscernible from it’s dairy counterpart. Super thick and creamy with tons of flavor. A favorite on toast, bagels or crackers.
This post is not sponsored but a compilation of my favorite products that I love and use every single day in my kitchen. I hope this helps you in cutting out dairy and focusing on a healthier, plant-based diet.
Quick & short update for the first day of my training week.
Sunday: 7 outdoor miles (fighting a head cold/sore throat) 30-35 mph winds.
Monday: Planning on 60 strength session at the gym (core/upper body/TRX)


+(1).JPG)

.jpg)


