четверг, 30 сентября 2021 г.

thumbnail

No-Bake Strawberry Cheesecake


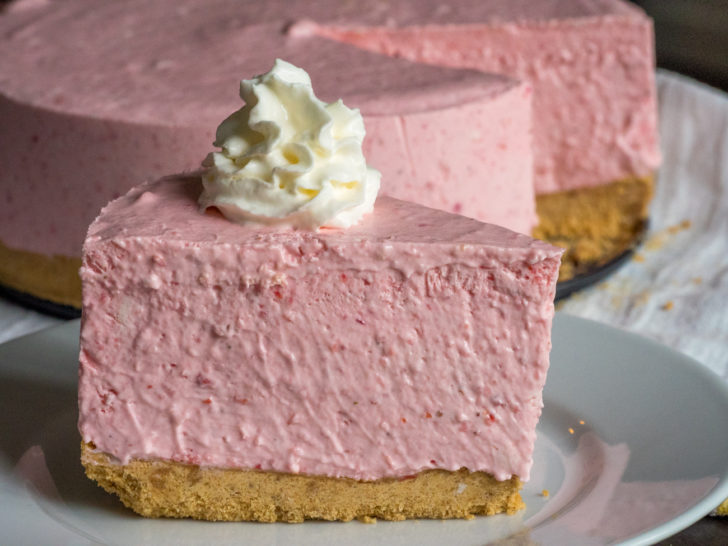
You know what we love? Delicious no-bake desserts that we can make all summer long without overheating our kitchens and giving ourselves heat stroke. Seriously, baking anything when it’s hot out is a recipe for disaster, but it’s always sad when we get a hankering for something and then have to curb that craving because it’s too much of a hassle to make…which brings us to today’s recipe: no-bake strawberry cheesecake!!


To avoid having a mixture full of eggs that needs to bake (and then cool) in the oven, we use frozen whipped topping and gelatin as the thickening agents in this fruity cake. You start with a typical graham cracker crust – we prefer ours on the thicker side with this recipe – then you prep your gelatin by dissolving it in warm water. Purée your strawberries along with the gelatin blend, which will add stability to your tall cheesecake, and then mix everything together with your cream cheese mixture. This makes one, heaping cheesecake, or you could make two to three smaller cakes…but really, there’s no way you can go wrong here.


What we love about this lofty dessert is how impressive it is (in taste and appearance), without being too heavy. With some cheesecakes that are super rich, you take a couple bites and then feel like you can’t move. For better or for worse, that’s not the case here and you can just keep digging into this tasty confection! For a tasty dessert that looks just as lovely, this is the perfect option to keep in your back pocket all summer long.


пятница, 24 сентября 2021 г.

thumbnail

New Orleans Jambalaya

This scrumptious New Orleans jambalaya recipe has been on my mind all month long! This weekend I’m packing my bags. On Monday morning I’m flying out to New Orleans!!! I feel so blessed to have been invited to mastermind with a wonderful group of creative women in one of the most festive cities in the USA. While I’m there I look forward to enjoying some authentic New Orleans jambalaya for dinner followed by a little bag of beautiful puffy beignets for dessert. I am so darn excited!


This yummy jambalaya recipe is a fabulous taste of New Orleans. What you’ll love most about preparing New Orleans jambalaya is that it’s an easy one-pot meal. I know that you and I are on the exact same page in looking for ways to free ourselves up so we can spend more quality time with our families. Life is fast-paced and hectic, so it’s more important than ever to find quick and easy recipes that will allow us to sit down at the table with our families and enjoy a delicious meal together. Spending time connecting with one another after a busy day keeps families bonded and tight, and encourages the doors of communication to remain wide open.


A traditional New Orleans Jambalaya recipe includes onions, garlic, Cajun seasonings, a bevy of bright colorful bell peppers, chicken, shrimp, and delicious smoked sausage.


For this mouth-watering New Orleans jambalaya recipe I use Eckrich Original Skinless Smoked Sausage. It’s naturally hardwood smoked with a true smokehouse taste. On other occasions you can mix things up with Polska Kielbasa Skinless Smoked Sausage, Original Natural Casing Smoked Sausage, and Polska Kielbasa Natural Casing Smoked Sausage. With all of these awesome choices available, it’s easy to make versatile family meals that are quick, satisfying and downright scrumptious.


Here are all the ingredients you’ll need to make a spectacular New Orleans jambalaya: olive oil, celery, red onion, bell peppers (I use a colorful blend of green, red, yellow and orange), garlic, jalapeno, boneless/skinless chicken breasts, Eckrich Smoked Sausage, shrimp, okra, chicken broth, crushed tomatoes, long-grain rice and spices.


Because a store-bought jar of Cajun spices is not available everywhere, I love making my own homemade Cajun spice blend. It gives me the opportunity to dial up the heat when cooking for teens and adults that love spicy foods, or dial things down for family dinners with small children. My special Cajun spice mix includes easy-to-find spices that you may already have on hand: paprika, sea salt, black pepper, oregano, thyme, garlic powder, onion powder, and cayenne pepper. I also use two bay leaves for this jambalaya recipe.


To make this New Orleans jambalaya a quick one-pot meal, I do a little prep work the night before. I chop up the celery, bell peppers, and onions and refrigerate them in a zippered plastic bag. I chop up the chicken, slice the sausage, remove the shrimp tails and put them each in a separate container. The next evening when I’m ready to prepare my quick and easy New Orleans jambalaya recipe it’s a snap to get dinner made, on the table, and ready to enjoy with the family.


Start by adding 2 tablespoons of oil to a large cast-iron pan that has a lid. If your cast-iron pan doesn’t have a lid you can use a Dutch oven or another type of large, heavy pan.


Add in the celery, onion, bell pepper, garlic, and jalapeno.


Saute the veggies over medium-high heat until they just start to become tender. On my gas stovetop this process takes about 4 minutes flat.


Sprinkle the chicken pieces with salt and pepper. Add the chicken and smoked sausage to the pan with the veggies. Continue to saute everything until the chicken is no longer pink and looks like it’s almost completely cooked. Ahhh…the delicious savory smells rising from your stovetop and floating through your kitchen will get everyone excited about eating jambalaya for dinner!


Add chicken broth, crushed tomatoes, rice, seasonings and two bay leaves. With a wooden spoon, stir everything together until well combined. Cover the pan with a lid, turn down the heat to medium-low and allow the ingredients to simmer, stirring every five minutes until the rice is tender and cooked. On my stovetop this takes 25 minutes. The reason I stir the rice often is to make sure it doesn’t start sticking to the bottom of the pan and burn.


Once the rice is done, fold the shrimp and okra into the mixture. Cover the pan again and allow the shrimp to cook until it’s no longer pink. This only takes about five minutes.


Your scrumptious jambalaya recipe is now complete! It’s time to garnish your jambalaya with a few sliced green onions, fresh parsley, and if you’d like – a few colorful slices of bell pepper.


Take a moment to stand back and truly admire your beautiful, festive New Orleans jambalaya! Soon it will be enjoyed by your family and you’ll be receiving a lot of compliments. If your family is anything like mine, there might not be any leftovers for the following day. But hey, that’s okay! The important thing about dinnertime with your family is having the opportunity to converse with one another in a meaningful way. My family likes to share stories of what happened that day, brainstorm ideas and problem solve, celebrate accomplishments, and basically just feel the love that expands between all of us around the table.


During the fall and winter seasons jambalaya is a warm, cozy, hearty meal that your family will absolutely love. This evening after my husband served himself a bowl of my yummy New Orleans jambalaya and took his first bite, he said “this is really great – I especially love the sausage!” I just smiled to myself because I knew the secret ingredient that makes this New Orleans jambalaya so incredibly special. It’s the inclusion of time-honored Eckrich Smoked Sausage.


For more recipe inspiration and easy 15- to 35-minute meal ideas, be sure to visit Everyday Meals by Eckrich.


PIN IT TO PINTEREST


Save this yummy NEW ORLEANS JAMBALAYA RECIPE for later!


❤️MORE RECIPES YOU’LL LOVE


BAKING POWDER BISCUITS


TAHINI SALAD DRESSING


MEXICAN CHICKEN AND RICE


MONSTER MASH BROWNIES


SPOOKY HALLOWEEN SNACK MIX


New Orleans Jambalaya Recipe > Your Thoughts


After preparing a quick and easy meal with Eckrich Smoked Sausage what will you do with your free time? Will you read a book with your children, spend more quality time with your teenagers, or cozy up with your husband and watch a movie? What do you think about this New Orleans Jambalaya recipe? I’d love to hear your thoughts in the comments below!


среда, 22 сентября 2021 г.

thumbnail

My 'Bride in Wonderland' Bridal Shower


(This pic is minus 1 bridesmaid but she was there in spirit!)


I know...it's been a long time since I've blogged but this reason deserves the all the effort!


I had my beautiful/amazing/spectacular/etc bridal shower on Aug. 29th and I couldn't be happier with it. I still smile about it :) I owe a million thanks to my bridesmaids and family for helping to make it the crazy party it was!


The theme was chosen waaay back in February: A Bride in Wonderland Bridal Shower. There was no negotiating or doubt in my mind--it was PERFECT for me! We started the hunt for the most essential things from that moment forward and it turned out better than I could have ever expected!


Here are some pics to swoon over. But if you'd like to see more, check out the photographer's website here. Password is Melissa.


These are Wonderland flowers created by sisters in law


Here is the 'Melissa in Wonderland' banner I created and had printed with Banners on the Cheap. This was meant to be the Photo Op area. It was a hit! (In case you need any banners made, try them out. Their customer service was great and they had the best prices on the net!)


This is the Marriage Advice tree. We spray-painted this tree and I made tiny Mad Hatter notes for guests to hang their best marriage advice for me. Some notes probably should not be posted because they might be a tad bit explicit but let's just say I learned what I need to know :)


This is the Flamingo table. We poked mushrooms into green astroturf.


This was a little surprise I made for the bridesmaids. I photoshopped them into the Alice in Wonderland movie poster! They are my Royal Court afterall!


This was the Clock table. I actually hit jackpot when I randomly found over-sized metal clock arms one day at Marshalls for $2!


Tea Party table setting! Grass runners, teapot centerpieces with feather & flower arrangements, grass balls with butterflies and topiaries! We also added potion bottles that had 'Drink Me' labels. On the tables were the favors for the guests: Colorful tea bags with 'Drink Me' tags, and chocolate bars with 'Eat Me' labels.


The teapot flower centerpieces were beautiful! My co-worker, who has a flower shop, helped arrange them and we're so grateful! There was no way they would have come out this nice if we would have done them ourselves. She was able to copy a photo my sister found online!


Lots of thought went into the food. My cousins and aunt prepared pretty tea sandwiches in heart, circle, and triangle shapes. They also made two of the most delish salads I've ever tried! Check here and here for recipes. And my FAVE were the Fairy Tale Mushrooms made out of egg halves, tomato halves. and feta cheese sprinkles!


The Dessert Station was insane! It was created by my bestie and bridesmaid Nicky who spent all her free time working on and it def paid off! She kept it a surprise from me! For months it was called the Mystery Project LOL! Just look at all the detail!


And yes, she actually made these chandeliers! So glam!


Don't miss the Alice in Wonderland Pop-Up book! It's a masterpiece! I'm sooo glad I got to keep it! :)


Here is the Candy Table also included with the Dessert Station. Apothecary jars filled with all-time favorites! Only a handful of gumballs were left!


The Beverage Table included a different type of tea...the kind from LONG ISLAND! White Sangria and sodas were also offered, as well as some of the cutest water bottles I've ever seen!


The first game was called "Down the Rabbit Hole". We had 2 teams for 4 people compete. A tiny stuffed rabbit is tied to a long string. The first person drops the rabbit down her dress, the second person takes that rabbit and does the same and so on. The catch? The rabbit has an ice pack center! When the last person is finished stuffing the rabbit down her dress, she has to pull it up and hand it to the next person to pull up and so on. The first team to get the rabbit in and out of all their dresses WINS! The winners of the game were Marina, Lisa, Denise, and Yams.


The second game was called "The Almost Newlywed Game" and we had a special guest appearance! The soon-to-be-hubby showed up for this one. We had answered 20 questions about each other on our own and had to show our answers to the public. 2 contestants had to decide if our answers would match or not. It was hilarious and kinda crazy how we barely had any of the same answers!


The third game was the Hot Potato Centerpiece Raffle. When the music stops, the person caught with the prickly bouncy ball is out!


I realize this is a very long post and yet there is so much more where this comes from! I had such a great time and I hope my guests did too! Let the celebration continue! On to the next party!


вторник, 21 сентября 2021 г.

thumbnail

Ms. Humble's Whipped Cream Cheese Frosting

Can and should be halved for more modest, non-crazy pregnant woman portions
16oz cream cheese, room temperature
1 1/2 cup powdered sugar
1 teaspoon vanilla
1 cup heavy cream, cold. Higher the fat content, the better (I'm using 40% Ultra)


Beat the cheese, sugar and vanilla until smooth and fluffy. In a separate bowl, beat the heavy cream to nearly stiff peaks, then add the whipped cream into the cheese mixture and quickly and briefly beat to combine. Do not over beat.

Slap goose-egg sized portions of the whipped cream cheese onto your hot cinnamon rolls and consume with pregnant woman-like abandon.

Enjoy.


thumbnail

Molten Brownie Pudding {Instant Pot}

This Molten Brownie Pudding made in your Instant Pot is decadent, divine a chocolate lover’s dream come true! Scoop some ice cream on top and you’ve got a fabulous dessert.


I know it’s November and your mind might only be thinking pies and pumpkin desserts right now, but today let’s take a break from all that holiday baking hoopla and talk chocolate, Molten Brownie Pudding to be exact.


It’s no secret chocolate is my life (ok, so is peanut butter). I don’t know about any of you, but a chocolate dessert at our Thanksgiving isn’t unusual.


So even in the midst of all my fall baking, there is always chocolate baking going on.


So if you’re like me and you always have a chocolate craving then this Molten Brownie Pudding will definitely curb that craving.


Served with a scoop of vanilla ice cream. . . .um hello!!! I could lie and tell you it was awful, disgusting and totally not worth the calories, but that would not be very nice of me.


  • 1 1/2 cups water
  • 7 tablespoons butter, (melted & divided)
  • 1 cup sugar
  • 2 eggs
  • 1/4 cup flour
  • 1/4 cup plus 2 tablespoons unsweetened cocoa powder
  • 1 teaspoon vanilla
  • 1/8 teaspoon salt
  • 1/4 cup semisweet chocolate chips
  • 1/4 cup milk chocolate chips

  1. Pour the 1 1/2 cups water into your Instant Pot. Place the steam rack inside.
  2. Butter a 6- to 7-inch souffle or baking dish with 1 tablespoons of the butter.
  3. In a large bowl, using an electric hand mixer, beat together the sugar and eggs until light and fluffy, about 4 to 5 minutes.
  4. In a small bowl, whisk together the flour, cocoa and salt. Add this to the sugar and egg mixture and mix until just combined. Mix in the vanilla and the remaining 6 tablespoons of melted butter and mix until just combined.
  5. Pour mixture into the prepared dish and sprinkle with the chocolate chips. Place on the steam rack and secure the lid.
  6. Select Manual and cook at high pressure for 30 minutes. Once cooking time is complete, do a quick release. Carefully remove the lid so that any condensation doesn’t drip on the pudding. Carefully remove the baking dish using mitts or tongs.
  7. Let cool for about 5 minutes before serving. Serve with a scoop of vanilla ice cream, if desired.

Notes


If your dish doesn’t have handles, you can make a sling with a piece of foil, folded in half twice, that’s long enough to go under the dish and stick up 6 inches on each side, creating handles. My dish doesn’t have handles and I didn’t want to worry about making a foil sling, so I just carefully lifted it out with hot pads.


понедельник, 20 сентября 2021 г.

thumbnail

Mint Chocolate Chip Cookies

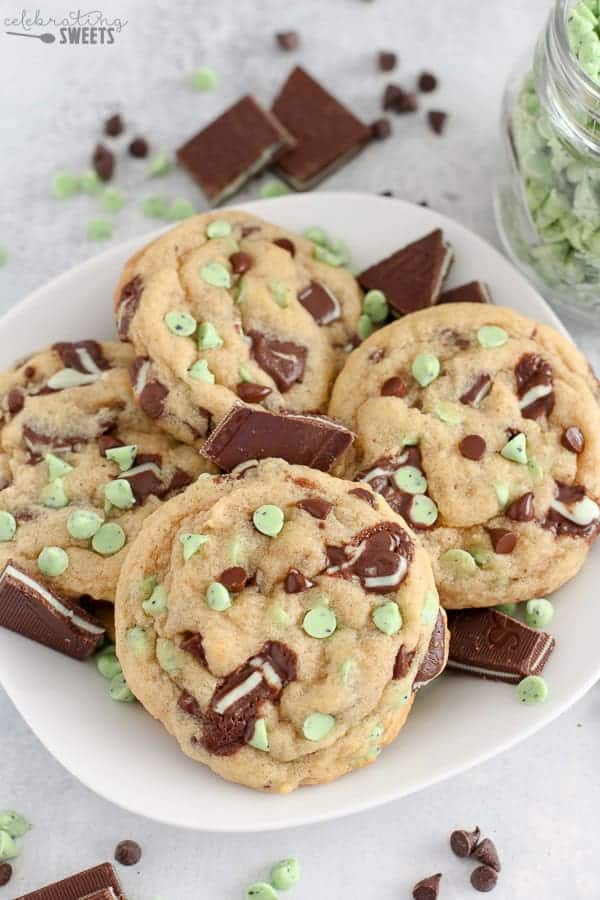
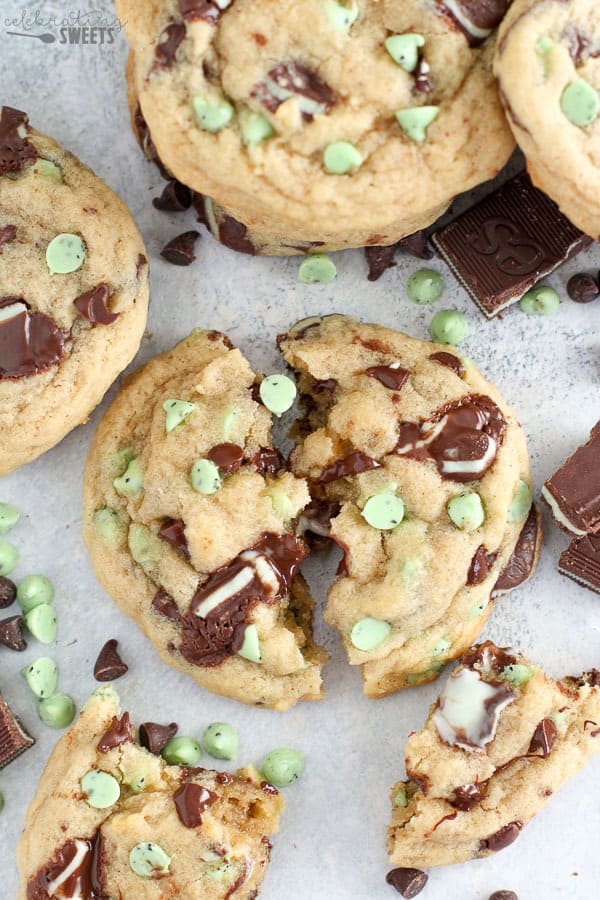
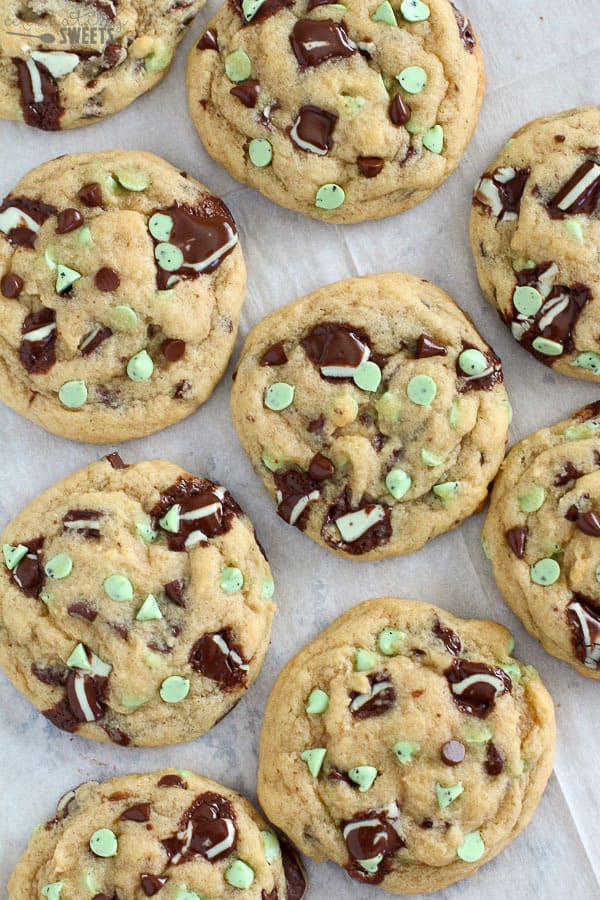
Big, soft cookies filled with Andes Mint Candies, Mint Chips and Chocolate Chips. Mint and chocolate in every delicious bite! No chill time; you can enjoy these Mint Chocolate Chip Cookies in 30 minutes!


Mint Chip Cookies ona White Plate.

Is there just enough green in these Mint Chocolate Chip Cookies to make them appropriate for St Patrick’s Day? I say yes!


In the past I always made Guinness Brownies on St Patty’s Day, but seeing as how my kids probably shouldn’t be consuming beer brownies with whiskey frosting, I decided to make a kid-friendly St Patrick’s Day dessert (don’t worry, adults will love these too!).


Stack of Chocolate Chips Cookies

Mint Chocolate Chip Cookies


What we have is soft and chewy peppermint cookies loaded with mint chips, chocolate chips and Andes chocolate candies.


To increase the peppermint flavor just a touch, I also add a little bit of peppermint extract to the cookies. This gives an underlying peppermint flavor in every single bite.


Chocolate chips and cookie batter in a white bowl.

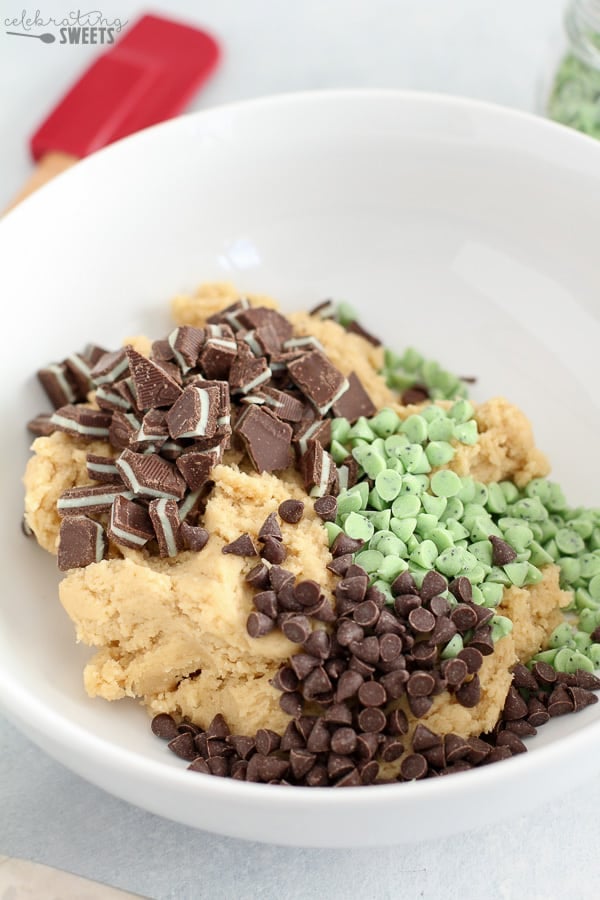
You can pick and choose which mix-ins you want to use. You can add just Andes Mints, or just mint chips. I will say that I think the Andes really take these over the top. They bring the status from good to great. I mean, do you see those melty little pools of chocolaty-peppermint deliciousness? Gah!


Mint Chocolate Chip Cookies now have a permanent spot in my baking rotation.


Warm Mint Chocolate Chip Cookie on a piece of parchment paper.

If you’re a fan of chocolate and peppermint you will go crazy for these. I would normally never choose a mint-chip cookie, but I seriously loved these Mint Chocolate Chip Cookies! I might have lost some self control when these beauties were fresh from the oven. One bite led to another, and let’s just say I lost count how many were consumed. Can you blame me?


Cookie dough balls on a baking sheet.

Have yourself a safe and Happy St Patrick’s Day! Oh, and check out my Guinness and Irish Cheddar Mac and Cheese (we need some “real” food before eating all the Mint Chip Cookies, right?).


NEVER MISS A RECIPE!


SUBSCRIBE to our free EMAIL LIST – LIKE us on FACEBOOKFollow on INSTAGRAM


Mint Chocolate Chip Cookies on a baking sheet.

You might also like: Mint Chip Cookies & Cream Ice Cream (no churn) , Healthy Mint Chip Smoothie, White Chocolate Dipped Peppermint Cookies.


Mint Chip Cookies ona White Plate.

thumbnail

Mini Raspberry Almond Tarts

Save


Overhead view of Mini Raspberry Almond Tarts with powdered sugar on a silver tray.

These adorable Mini Raspberry Almond Tarts have completely stolen my heart. Aren’t these the sweetest little Valentine’s treats? We love anything with almond flavoring around here, and these tiny tarts were there one minute and gone the next!


Stacked Mini Raspberry Almond Tarts on a sliver tray with a jelly jar in the background.

I made them in my mini muffin pan and using the mini muffin liners really made them easy to remove from the pan. Be sure to let them cool completely before trying to remove them. You will not need to spray the muffin liners with nonstick spray. The liners came off easily once the tarts were completely cooled.


Close up view of Mini Raspberry Almond Tart showing the inside.

You could use any flavor of jam or preserves you have on hand. Strawberry, cherry, or peach would be delicious. The center will sink a bit when the tarts are baked, so fill the center with more preserves than you think.


Close up view of Mini Raspberry Almond Tarts stacked.

This recipe makes two dozen Mini Raspberry Almond Tarts but can be easily doubled. It is helpful to have a small, spring-loaded cookie dough scoop to portion the dough evenly into each of the muffin wells. If you don’t have one, just make the dough into one-inch round balls (one level tablespoon).


Mini Raspberry Almond Tarts on a sliver tray.

Make these Mini Raspberry Almond Tarts for someone you love! They’ll definitely get the message.


Did you make this recipe?


Please let me know how it turned out for you! Leave a comment below and share a picture on Instagram with the hashtag #lovelylittlekitchen


Can't get enough?


Subscribe and I'll send all my recipes right to your inbox! You can also keep up to date by following me on Pinterest, Instagram, Facebook, YouTube, and Twitter.


Overhead view of Mini Raspberry Almond Tarts on a sliver tray.

Save


вторник, 14 сентября 2021 г.

thumbnail

Millionaires Chocolate Pecan Pie


This dessert pie, layered with chocolate, coconut, and pecans, tastes like a million dollars!


Ingredients


  • 2/3 cup dark-colored corn syrup
  • 1/2 cup sugar
  • 1/2 cup butter or margarine
  • 4 eggs
  • 1/4 cup all-purpose flour
  • 1 teaspoon vanilla
  • 1 recipe Pastry for Single-Crust Pie (see recipe below)
  • 1 6 ounce package (1 cup) semsiweet chocolate pieces
  • 1 1/3 cups flaked coconut
  • 1 cup pecan pieces (about 4 ounces)
  • Whipped cream (optional)
  • 1 1/4 cups all-purpose flour
  • 1/4 teaspoon salt
  • 1/3 cup shortening
  • 4 - 5 tablespoons cold water

Join my free Group. There are a lot of members who exchange their recipes and cooking tips: Click here


Instructions


  1. In a small saucepan, stir together corn syrup and sugar. Cook and stir over medium heat until sugar is melted and mixture boils; remove from heat. Stir in butter until melted; set aside to cool slightly (about 10 minutes).
  2. Meanwhile, on a lightly floured surface, roll Pastry for Single-Crust Pie to form a 12-inch circle. Ease into a 9-inch pie plate, being careful not to stretch pastry. Trim pastry to 1/2 inch beyond edge of pie plate. Fold under extra pastry. Crimp edge. Set aside.
  3. In a large bowl, beat eggs, flour, and vanilla with electric mixer on medium speed until mixture is blended and smooth. Add corn syrup mixture in a slow, steady stream, beating constantly.
  4. In pastry shell, layer coconut, semisweet chocolate pieces, and pecan pieces. Pour egg mixture over all, spreading evenly. Cover edge of pastry shell with foil.
  5. Bake in a 325 degree F oven for 1 hour. Remove foil; bake for 20 minutes more or until filling is set in center and slightly puffed. Cool completely on a wire rack. Serve with whipped cream, if you like. Makes 8 to 10 servings.
  6. Pastry for Single-Crust Pie
  7. In a mixing bowl, stir together all-purpose flour and salt. Using a pastry blender, cut in shortening until pieces are pea size. Sprinkle 1 tablespoon of cold water over part of the mixture; gently toss with a fork. Push moistened dough to the side of the bowl. Repeat moistening dough, using 1 tablespoon cold water at a time, until all the dough is moistened (4 to 5 tablespoons cold water total). Form dough into a ball.

пятница, 10 сентября 2021 г.

thumbnail

Millionaire Bars

Millionaire bars

Millionaire Bars offer layer upon layer of decadent goodness with a shortbread layer on the bottom, a caramel layer in the middle and chocolate on top! It tastes almost like a Twix bar and is the perfect cross between a dessert bar and a candy bar! You are going to love these Millionaire bars.


If you like Twix bars, you are going to just adore this recipe for Millionaire Bars because they taste just like a Twix bar! These Millionaire bars start with a layer of shortbread cookie on the bottom, then in the middle is a decadent caramel layer and it’s all topped off with melty chocolatey goodness with a sprinkle of sea salt for good measure. I don’t know how these bars got the name “Millionaire Bars” instead of “Billionaire Bars” because if you ask me, I’d call ‘em Billionaire bars. They are sweet with just a hint of salt, and truth be told, they are kind of addicting. And like I said, if you like Twix bars…. these Millionaire bars are for you!


Millionaire bars 5

One of the best tricks I have learned along the way is that when I am making any sort of dessert bar, line the pan with foil. You know what I’m talking about right? You place a piece of foil in the pan going one direction, allowing the foil to hang over the edges, then place another piece of foil in the pan going the opposite direction, again, allowing the foil to hang over the edges. This makes it so easy for you to just lift the bars out of the pan to cut them into squares.


Millionaire bars fb

Each layer comes together pretty quickly, but you will have to allow each layer to set and/or cool before moving on to the next, so it will take a little bit of time to complete these bars. The actual hands-on time required for this recipe is pretty minimal.


Millionaire bars 4

I think my most favorite part about these Millionaire Bars is the little bit of sea salt that gets sprinkled on top. If you don’t have sea salt on hand, you can just eliminate it, but there’s something about the sweet/salty combo that I just love! Make sure the bars don’t sit in the fridge too long at the very end, otherwise the chocolate will get too hard and it’ll crack when you go to cut the bars into pieces.


These Millionaire Bars are a cross between a dessert bar and a candy bar, which makes them the best of both worlds. Enjoy!


Millionaire bars 2

среда, 8 сентября 2021 г.

thumbnail

Meyer Lemon Brûlée Tart

Meyer Lemon Brûlée Tart


Sweet and tart lemon filling all Brûléed on top with a nice sugar crust then, that sweet lemon is surrounded by a simple shortbread crust! And, OMG is it delicious! We were super impressed by this dessert!


I decided to make a Meyer Lemon Brûlée Tart with Shortbread Crust for this lemon dessert challenge I took on with some blogger friends.


I’ve teamed up with some amazing food bloggers to bring you some delicious lemon recipes!


You’ll find both savory and sweet recipes in this collection, just make sure to scroll down below the recipe to see all the other great recipes in this collection!


This post may contain affiliate links. I earn a small commission for my endorsement, recommendation, testimonial, and/or link to some products or services from this website. Your purchase helps support this blog at no additional cost to you and allows me to continue bringing you delicious recipes and great information. For more information see here.


If you’d rather skip my helpful tips, tricks, essential cooking information, and delicious similar recipe ideas – and get straight to this recipe – simply scroll to the bottom of the page where you can find the printable recipe card. It’s right there with a pretty bright yellow background.


If you have any questions about how to make this recipe, or if you try it, please come back and leave a comment below letting us know how it goes.


Lemon desserts you’ll love!


Meyer Lemon Brûlée Tart with Shortbread Crust is a stunningly delicious little dessert.


Sweet, but not too much. Light with citrusy lemon. Buttery shortbread crust.


All topped off with a crispy caramel Brûléed sugar top. Oh, it’s like heaven on a plate!


This tart would be great for a special meal like Easter or Mother’s Day. And, I’m looking forward in the year quite a bit, but this would be so awesome for after a big heavy meal like Thanksgiving, since this tart is nice and light in flavor. I think all of my family will love this one!


I suggest lemon extract for this dessert. I love using just a little bit of lemon extract in my lemony desserts. I think it brightens them ever-so-nicely.


But, if you don’t have any lemon extract, and don’t want to buy any, no worries, the dessert is lovely without the extract. I just think the extract makes it a little more special!


I’ve made a whole Pinterest board for Citrus! Come take a look, you’ll find my recipes, plus a whole lot more!


Check out all the other lovely lemon recipes below from bloggers who took part in our 30 Day Lemon Challenge.


Follow me on Pinterest


I have a board dedicated to citrus over there! Come take a look.


I’m testing Pinterest’s new pincodes. The circle image you see is their pincode for my board. If you open the camera within your Pinterest app on your phone and aim it at the circle, it’ll take you to my board. So, as long as Pinterest supports this technology, it should work.


I also made it so you can simply click the image to get the board.


If you like seeing my recipes subscribe via email in the upper right, or with push notifications using the red bell.


Or, connect with me on your favorite social media channel for recipes, photos, and much, much more:


And find my shop on Amazon for recommendations on cool tools


Meyer Lemon Brûlée Tart with Shortbread Crust Recipe


thumbnail

Meringue That Won’t Weep

Lemon Meringue Pie with Meringue That Won't Weep on a bright tablecloth.
Lemon Meringue Pie

Flavors of Summer


The long spell of hot weather that was hovering over the Pacific Northwest has broken now. The skies are bright and brushed with wispy clouds and the morning air feels cool against my skin. That cooler air beckons me back into the kitchen. Still the heat is simmering in my mind as I stir my kitchen memories on a quiet Monday morning.


When I was a child something was always happening in the kitchen, no matter the ambient temperature. Even on the hottest summer days there was food to prepare and people to be fed. Fried chicken takes a skillet of hot grease to transform it into crisp tender mouthfuls of southern perfection. Corn on the cob takes a kettle of boiling water to bring out its bright color and juicy sweetness. Even summer salads made with pasta or potatoes must be prepared on the stove top.


Many a dreamy summer dessert that is regarded as “cool” or “tart” also spends some time in a hot oven. Think of Baked Alaska, or the mountains of foam piled invitingly high on top of a Lemon Meringue Pie. Even these refreshing desserts need some heat to set those golden peaks. The alchemy of the kitchen is almost always hot work! To delight and nourish family and friends, someone has to do it. When I was a girl that someone was Aunt Hen.


A collection of recipes including Meringue that Won't Weep from a page in the Family Heirloom Cookbook.
Pages from my Family Heirloom Cookbook

Kitchen Alchemy


Of course there are dishes that can both feed a family and avoid the heat. These days if you can’t stand the heat there is no shame in getting out of the kitchen. Times have definitely changed.


Back when I was a girl those options were fewer. Produce from the garden needed to be cooked or preserved. Having grown up on a farm during the depression, and ever thankful for its abundant produce, Aunt Hen was reluctant to let any food go to waste. What’s more, relying on what are now common alternatives to cooking an evening meal were then thought to reflect a lazy character or a lack of thrift. Besides packaged foods and deli selections were pricier than home cooked, and take-out was harder to come by.


I think my aunt considered those options beneath her dignity for much of her life. My uncle worked hard and when he was alive Aunt Hen saw it as her responsibility to feed him well. To her that meant preparing hot home cooked meals, regardless of the season. She took pride in her skills in the kitchen and the pleasure others took in the food she prepared.


Later in life she had my brother, my dad and I to feed. Despite those changes in circumstances, she still took her role as the family cook seriously. Even after my brother and I moved away from home, summer visits to Aunt Hen’s often found her standing in her fragrant, steamy kitchen. There she would be stirring something over the hot stove, sweat rising on her brow as a box fan at the periphery of the room blew a scant breeze her way.


Avoiding Tears


On one hot summer morning she offered to make a pie for me to take to my grandfather’s house later that day. As she cooked she carefully showed me how she made a meringue topped pie. We cooked the filling and smoothed it into the waiting pie shell. Then we beat the egg whites until frothy and followed one of her favorite recipes to create an impressive meringue that she confidently told me, “Would Not Weep!”


Back then, I wasn’t even aware that meringue could tend toward weeping. Pies were not my favorite dessert and I didn’t give much thought to their personal problems, to what made a pie perfect or what caused it to be a disaster.


Now I understand that weeping meringue is an age-old problem. No one likes sticky beads forming on top of their pie, or a damp sticky layer between pie filling and topping, especially after making the effort to create something special. No, weeping meringue can be a real challenge to bakers, especially when it is humid. And believe me, there are few places more humid than Aunt Hen’s kitchen, near the banks of the Ohio River, on a summer’s day.


While weeping meringue is a real problem, Aunt Hen had a solution. She had discovered a No-Weep Meringue and she loved to share the recipe well into her eighties. Even after she had moved to a nursing home, Aunt Hen would call me and ask me to look up the recipe for her. She would direct me to her cookbooks and have me pull out the blue one. With my heart melting in my chest, I would lovingly open her old cookbook and read to her the carefully handwritten recipe that she eagerly wanted to share with a new friend:


Meringue That Won't Weep
Pin Print

From page 13 of Aunt Hen’s “Favorite Recipes” (the blue volume)

A Recipe Aunt Hen loved to share.


Ingredients


Directions


  • Place cornstarch, sugar and water in a small saucepan. Cook over medium low heat until clear. Set aside.
  • Beat egg whites until foamy and beginning to peak. Add cooled cornstarch mixture.
  • Continue beating the egg whites while gradually adding 6 Tablespoons of sugar. Beat until very creamy.
  • Pile meringue on pie spreading it to touch the edge of the crust all around.
  • Bake 30 minutes at 325 degrees, or until the top is kissed with a golden brown color.
  • Serve with confidence and enjoy!

понедельник, 6 сентября 2021 г.

thumbnail

May the Fourth Be With You - Star Wars Party!

I have always wanted to host a Star Wars themed monthly dinner, so I have been waiting and waiting for our dinner to fall on May 4th. It finally did this year...hence, the May the Fourth Be With You theme! This theme was so fun, and super easy to pull off.


Invite: I made the invite on PhotoShop. The Star Wars font is available for free from tons of sites. I used the Star Wars Rounded font for most of the invite.


Entry: I have a very talented student leader in my class this year, and she helped me make this amazing Darth Vader entry sign to welcome guests "to the Dark Side". We made it out of poster board and card stock. I borrowed some light sabers from a friend to add to the entry.


Inside Decor: For the dinner table, I bought a Darth Vader backpack from a local store to place as my centerpiece and some mini C3PO figures to place on each side of it. I used fishing line taped to my ceiling to hold up two crossing light sabers.


I love the C3PO water bottles and R2D2 cups I created for the party. I found the template for the cups online on the Catch My Party website here. I just used white paper cups I bought at the Dollar Tree and glued them on. Since these two droids are always together, I wanted to have C3PO next to him. I came up with these water bottles. I bought gold metallic spray paint and sprayed them after removing the label. I then cut two large circles and the rectangle mouth out of gold card stock, drew the lines in thin black sharpie and taped them on. Super easy.


I bought black square plates from the Dollar Store and used scrapbooking tape to adhere a Star Wars logo to the middle. The light saber napkins were easy to make. I came up with the idea for these and was rather excited, but then discovered someone else on the internet had this idea too. Lucky for me, they had already create the image, so I just used what they had already created here.


I thought long and hard about what to make as a place card. I even watched the original movie one more time to get inspiration. I came up with these super cute tie fighter place cards. They do take some time to make, but since I was only making some, I was able to get them done.


I designed two simple wine bottle labels using PhotoShop. For the Red Wine, I chose to use Darth Vader who is associated with red. I used Yoda for the white and phrased the label's words the way Yoda speaks in the movies.


Menu: I went with a simple menu because these items were easy to fit with the characters of the Star Wars movies. I started with a Tie Fighter appetizer. These are just octagon crackers I found at the grocery store and cheese rectangles. The are held together with cream cheese mixed with garlic powder, Italian seasoning, and a little bit of salt and pepper. Yummy!


For the main dish, I served "Han"burgers of course after Han Solo. I placed all the fixings on the side to add what they wanted.


I served easy to prepare fruit kabobs as one side dish. Since I teach all day on the days of these monthly dinners, it is great to do some things the day before. Definitely helps with my stress level -- yes...I am always super stressed since I'm always so last minute! These Obi-Wan Kabob-ies were also a way to tie in the character Obi Wan Kenobi.


I called on my amazing friend Deanna for help in making a pasta salad. She is an amazing cook, and this salad was just another example of her talents. It was delicious. We used bow tie pasta to represent the character Boba Fett.


For a yummy and sweet dessert, I made Princess Lea cupcakes. These are so cute, this awful photo doesn't do them justice. I used black frosting to make the hair and attach the Oreos. At first my plan was to use brown (so it would be more like Princess Lea), but that meant I would need to dip the Oreos in chocolate so they would match. That was too much work for me, so I just went with black. The rest is just frosting I piped on.


Favors: I had so many ideas for a thank you for coming gift, that I had to figure out a way to incorporate them all! I designed these Darth Vader and Storm Trooper bags using card stock and bags I found at the Dollar Tree. Don't you love how they turned out?


I designed these tags to attach to the bags.


Inside, I used little favor bags bought from Michaels to put small candy in. Rolos for Han Solo (Rolo), gummy bears to represent Ewoks, and chewy Lemonheads to represent Chewbacca.


This is a great theme for a kid or adult birthday party. My kids were loving everything, and they are already asking for a Star Wars themed party of their own!


Happy May the 4th...May the Fourth Be with You!


About

Поиск по этому блогу

Технологии Blogger.