This Caribbean Sunset Martini Recipe is an easy martini recipe perfect for anyone who loves coconut and raspberry.
Caribbean Sunset Martini Recipe
You all know I am a fan of sunsets all around the world. If you have checked out our Instagram page it is filled with sunset pics.
While on the Carnival Splendor they had a martini called the Caribbean Sunset and I had to try it! How could I not sit down and enjoy a killer fruit-based martini and of course get the Caribbean Sunset Martini Recipe so I could share it with all of you?
The funny thing is I was sailing home from Mexico when I tried this cocktail not even close to the Caribbean. I still had to try it and make sure that it lived up to its name.
I will say this cocktail is strong! It is one that you want to enjoy slowly or you may be tipping over as you watch the sun go down.
Do you love cruise vacations? Are you dreaming of jetting off to relax on the deck of your favorite Carnival Ship? I know I am!
Until you get onboard why not enjoy these delicious Carnival Cruise cocktails!
What is your favorite drink to enjoy onboard the ship? Have you checked out an Alchemy Bar yet? They are our favorite place to relax with a good drink and chat with friends.
I love camping? I love planning our menu and cooking while on a camping trip. S?mores are the proverbial camping dessert- and I enjoy them but they can be really, really, really messy. I know, that is part of the fun! But sometimes the combination of marshmallow goo, sand, leaves, and the great outdoors is just a little too much for me. I thought up this yummy treat as an alternate option for our family in hopes that it will help cut back on some of the mess.
You have two choices for when to make these- you can assemble everything, wrap the whole thing in foil, and then just pull it out and place it on the campfire when you are ready to go. Or- you can bring the ?fillings? and let everyone assemble the cones as they choose there by your campfire and then wrap and cook.
For each camper you will need:
1 ice cream cone (I prefer sugar cones)
1 piece of foil- big enough to wrap the cone
And an assortment of the fillings of your choice. They can include but are not limited to:
Chocolate chips
Butterscotch morsels
White chocolate morsels
Walnuts
Peanuts
Almonds
Toffee pieces
Mini marshmallows
Brown sugar
Coconut
Cocoa nibs (raw chocolate)
Banana pieces
Dried fruit
Allow each camper to design their cone with the fillers of choice in layers. Wrap securely with foil and place over heat near campfire or on grill to allow the chocolates to melt. Unwrap and enjoy.
For a variation you can take waffle cone bowls and fill them with the fresh fruit of choice. Try these delicious combinations:
Fresh strawberries and chocolate chips
Peaches, white chocolate, and almond slivers
Apple slices, cinnamon, raisins, brown sugar, and butter
Bananas, butterscotch morsels, and brown sugar
You essentially create your own custom candy bar!
And yes, it is my fault that our drought is ending! We planned our big "Annual Family Camping Trip" for later this week. Just GUESS what the forecast is :-)
Thank you for visiting- please also visit www.cookingbright.com and become a fan on our facebook page cookingbright.com
"Cake in a Cup" was on of the first recipes I ever blogged. I made it a few times, thought it was great for being so easy to make and basically fat and calorie free...then I forgot about it. The other night I was craving something sweet and I remembered the recipe. It was good, but a little bitter - so I changed the recipe a tad and am now obsessed with my new Chocolate Cake in a Mug recipe. My fiance makes this 2-3 times a day. I just did a google image search to find a pretty picture to go with this recipe. In reality, cake in a mug is not that pretty. I guess you could take the time to make it appealing to the eye - but when it only takes 2 minutes to make and bake....who cares what it looks like! The possibilities are endless with this instant chocolate cake recipe. It's fantastic plain, but you could put a scoop of ice cream on top,whipped cream, fresh fruit, etc to spice it up. There is literally NO FAT in this recipe and the few calories come from what type of sugar you use. The fact that you make the "cake batter" in a coffee mug and then just microwave it makes it the easiest thing to make ever and it's the perfect portion if you are trying to watch what you eat.
Ingredients:
1 Tbsp Pure Cocoa
2 Tbsp Splenda Sugar Blend (if you're not counting calories, use the real deal)
2 Tbsp Self Rising Flour
2 Tbsp 2% Milk (you can use any milk, except for Skim)
1 Tbsp Water
Steps:
Put all of the dry ingredients into a coffee mug and mix well.
Add the milk and water to the dry ingredients and stir together until you have reached the consistency of cake batter. Stir hard and fast and make sure everything is mixed well. If the "batter" seems really thick and dry, just add a little milk until the consistency is a little lighter.
Place the mug in the microwave for 30-45 seconds and you will have a dessert that will love.
It may take you one or two attempts to get the recipe the way you like it. If you want more a more fluffy cake, microwave longer. If you want a combination of fluffy cake and gooey pockets of uncooked batter (which tastes like hot fudge) then you will want to stay around 30-35 seconds. Personally, I like the hot gooey pockets, so I go with less time. Whereas my fiance prefers a drier cake so he zaps it for about 40 seconds.
This is seriously the best recipe ever for when you are craving something sweet. I've been trying to think of things to add into the cake batter to change it up. So far I have added peanut butter and it didn't do much besides make the cake a little more moist and added an aftertaste of peanut butter. The image I posted came from a recipe for Chocolate-Coffee-Kahlua Cake in a Mug. I just read the ingredients and it is NOT healthy and not super simple to make...but it did just give me an idea for how to change up the basic chocolate cake recipe. I'm thinking add some instant coffee and flavored creamer or Kahlua into the batter then top it off with cool whip/vanilla ice cream and drizzle some caramel over it. I'll let you guys know how it turns out. If you come up with your own version...please share it with me!
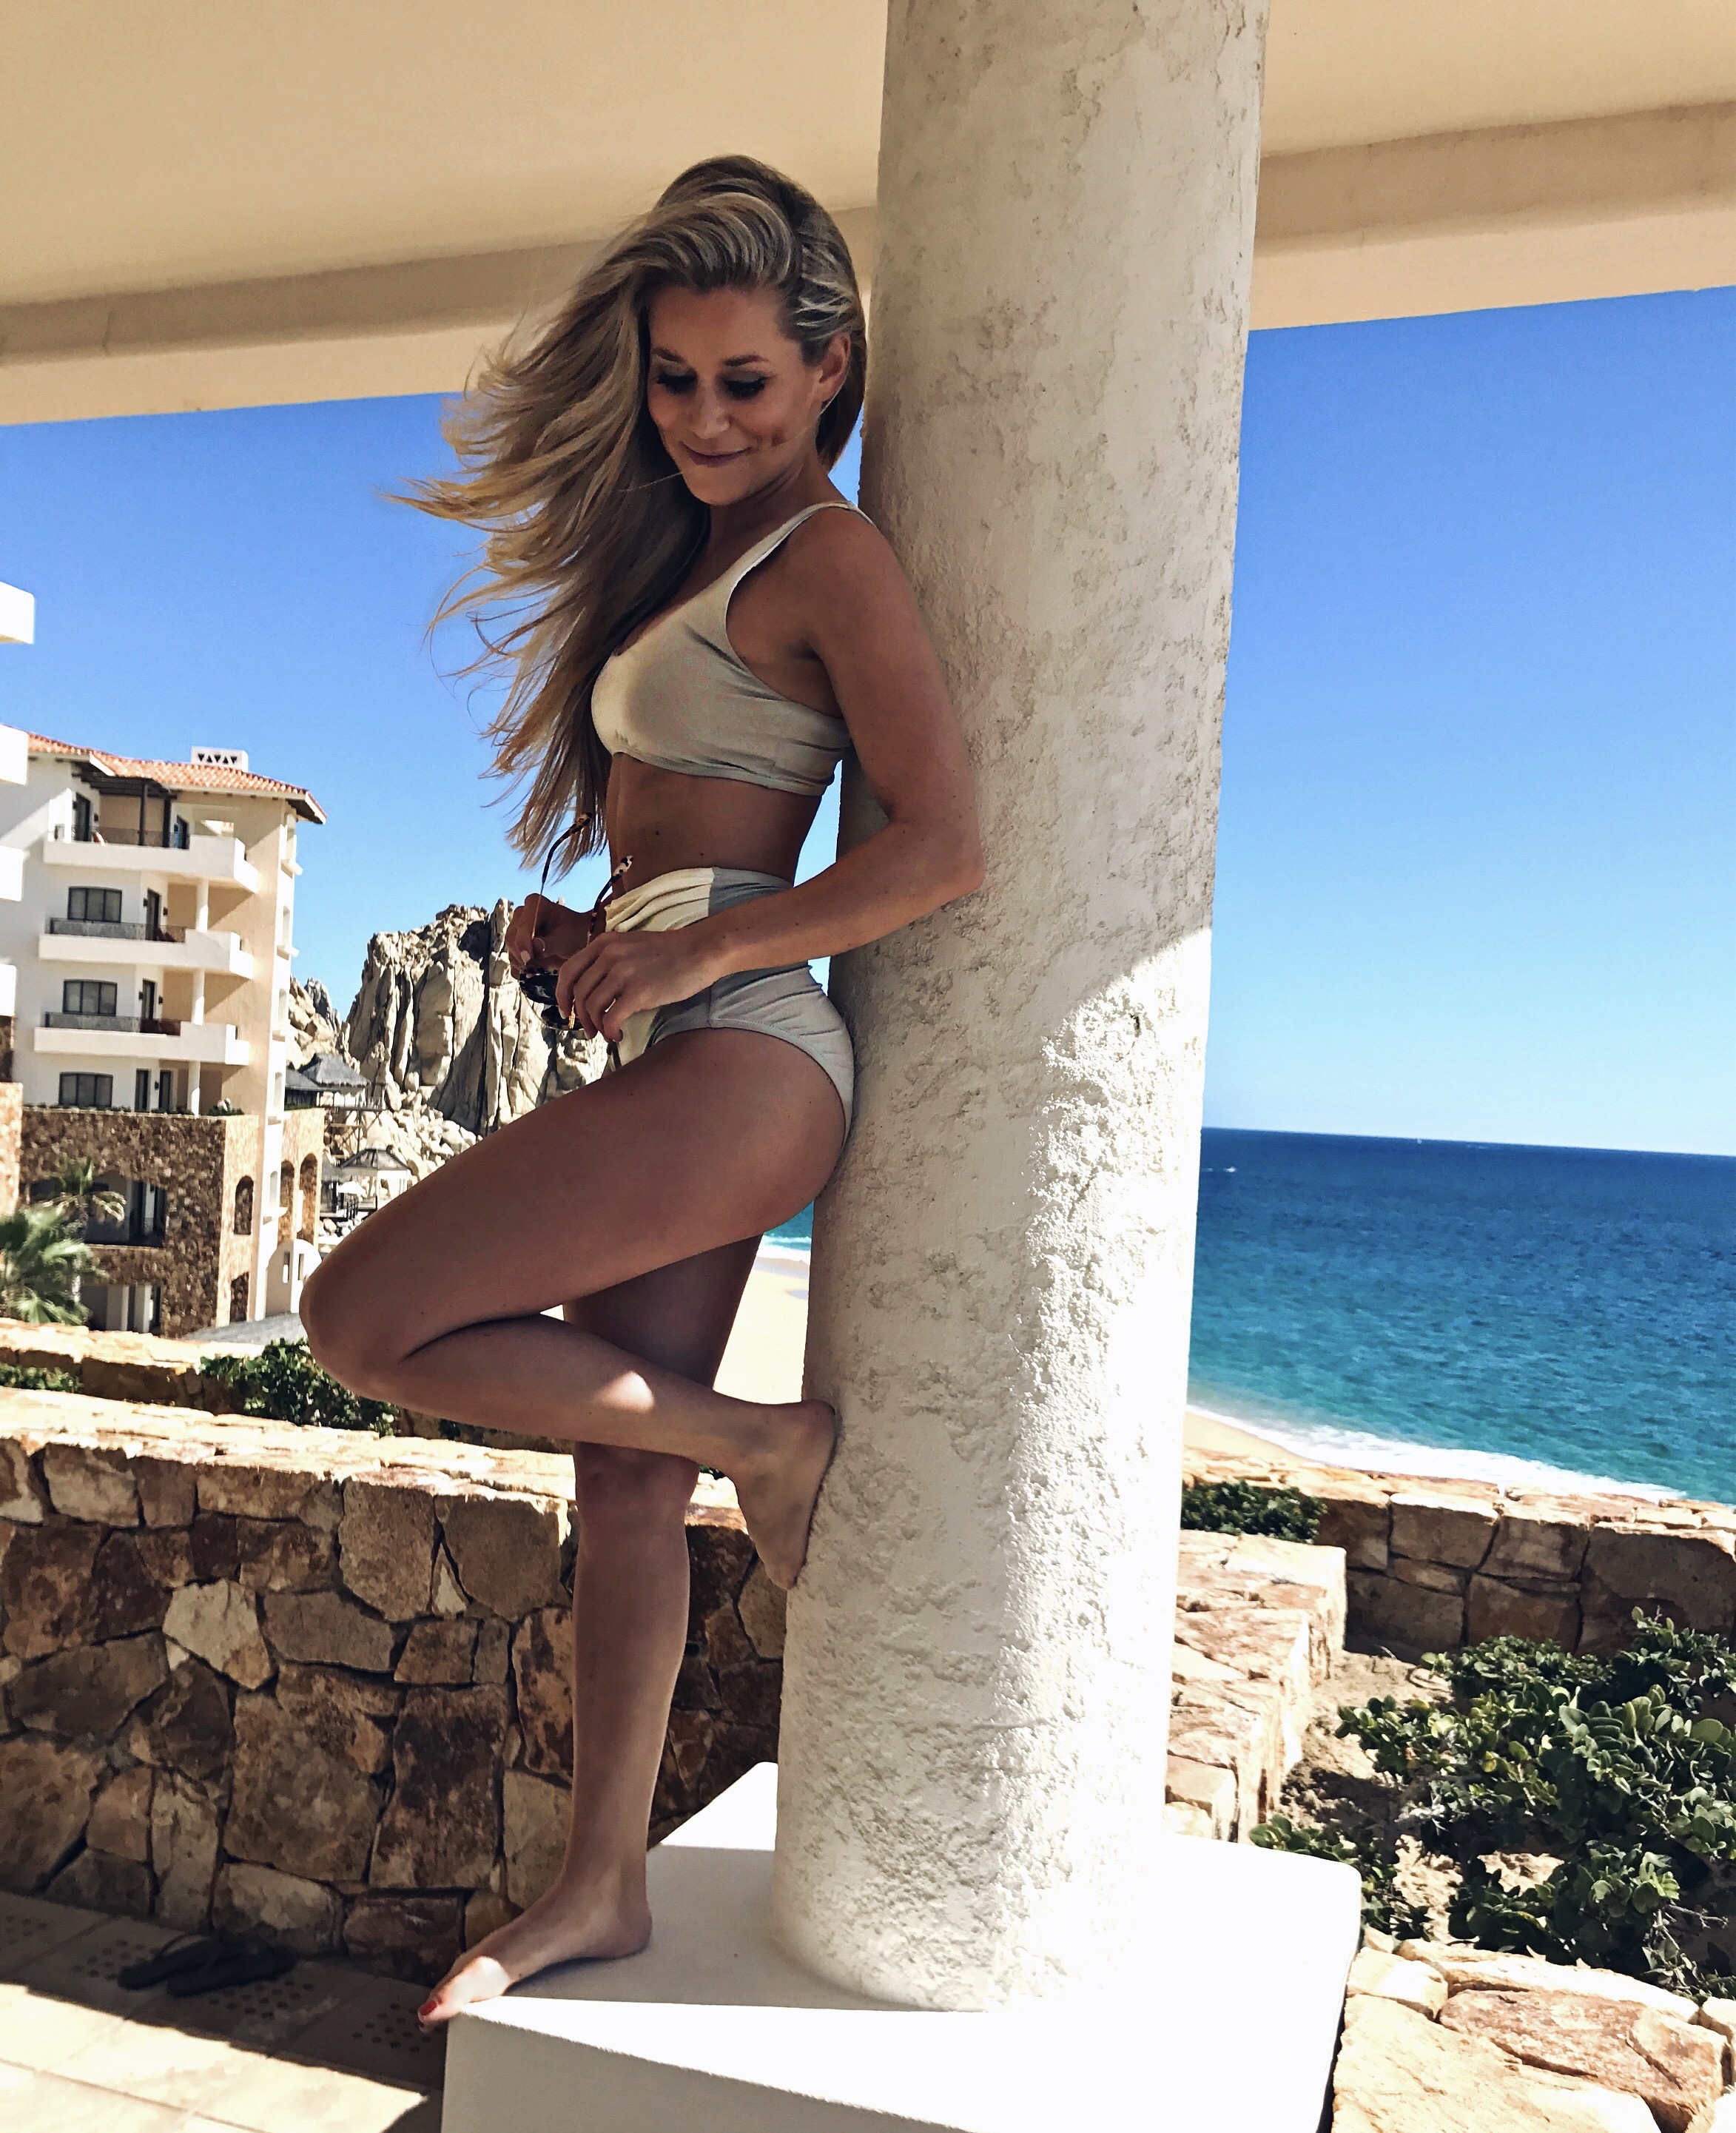
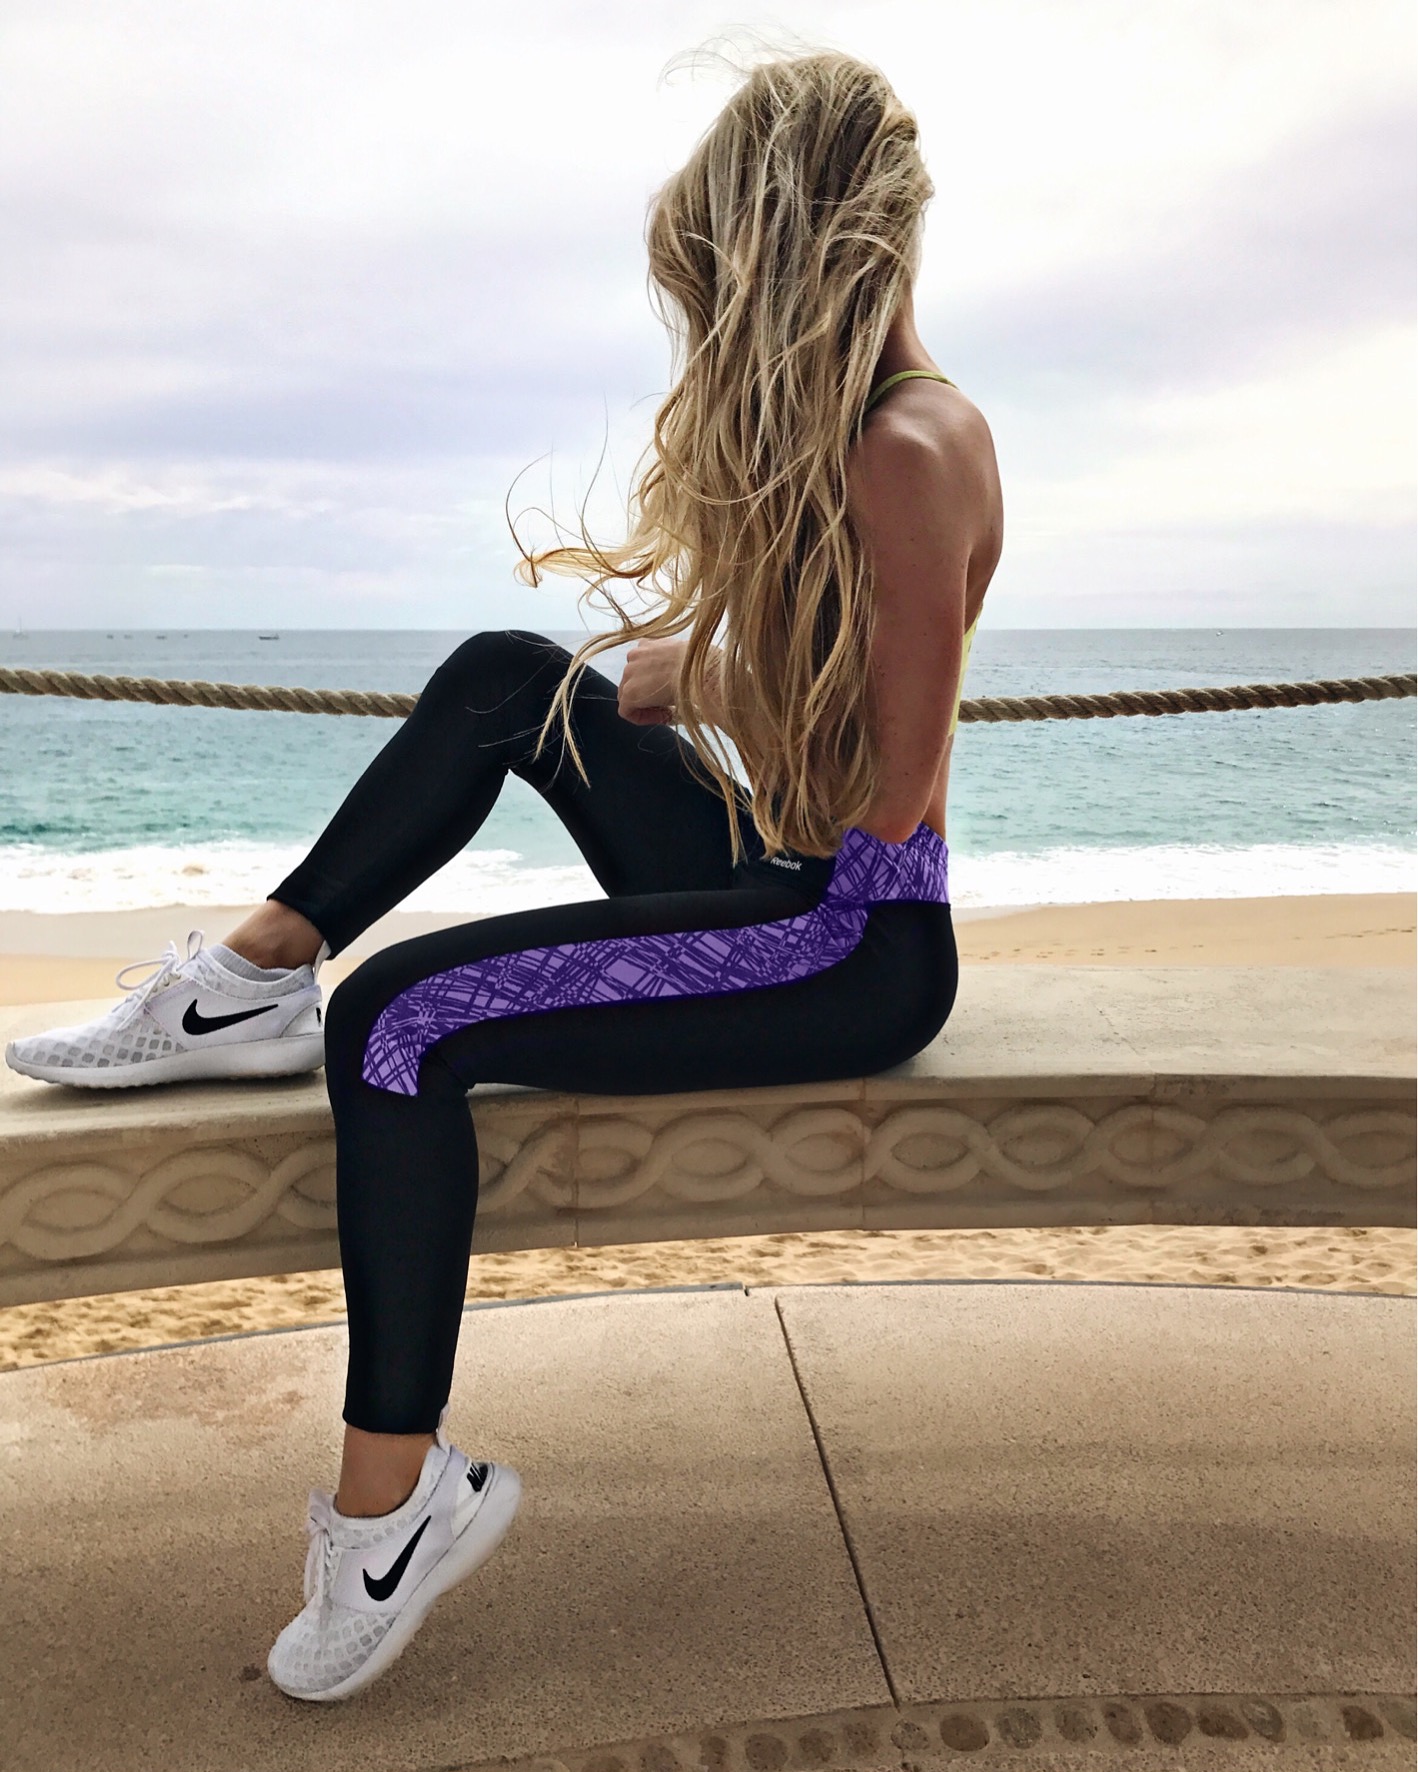
Hola people! I’m freezing cold back home in Chicago right now sitting next to my space heater, so I thought I’d type up a post to reminisce on the last two weeks and share all the info on the swimwear + beachwear I posted on my Instagram. And for all of you who e-mailed about your upcoming trips to Cabo – I’m giving my recommendations for our favorite spots to eat. Like I said in my last post, we’ve been vacationing there for the past 12 years (!!) – so I have plenty of suggestions..
Swimwear from the trip:
This top sold out pretty quickly but may be getting restocked:
Top | Bottoms (xs) by Marysia Swim, here are a few similar options from the same collection:
Grand Solmar – we’ve been staying here for years. It’s a stunning resort built into the rocks that form the Arch of Cabo San Lucas. A private beach, several infiniti pools, swim up bars, an incredible staff that we love, and so much more. 10/10!
Where to Eat (dinner spots we visit every year):
Maro’s Shrimp House – our favorite local spot, we go here ever year. It’s very casual and has awesome seafood. Order ‘mother’s milk‘, it’s the best drink in Cabo! Order the steamed lobster + shrimp with butter to dip it in. The restaurant is covered in college team flags – sign your name on your alma mater ��
Romeo & Julieta – the best Italian spot. It’s a really pretty setting with live music and delicious authentic Italian food. Get reservations to sit outside in the outdoor courtyard. The Sangria is delish.
Los Tres Gallos – such a beautiful atmosphere and some of the best authentic Mexican food we’ve had! It’s an outdoor restaurant built around a giant tree covered in lights and ornaments. Everything from the colorful table cloths, unique table settings, and traditional dishes give you the perfect authentic experience.
Maria Jimenez – one of the other best spots for authentic Mexican – all of the locals recommend this one, which is saying something. Affordable and quaint.
Nick San – the best sushi spot in Cabo. Loud, vibrant, and fun atmosphere.
The Office – this is a must. An ocean front restaurant with a tropical vibe with tables in the sand surrounded by tiki torches and colorful linens. Great seafood and fun beachy feel. Amazing margs and fresh fish.
DOC Wine Bar – small intimate setting with best pasta options in Cabo. Great wine and steaks.
Edith’s – Great spot. Order the caesar salad and banana flambé for dessert and the table side Mexican coffee.
Club/Bar Scene:
Cabo Wabo – older crowd but fun. Live band!
Mandala – awesome night club, ceiling is covered in disco balls.
Jungle Bar – divey but fun.
Saloon – ride the bull and ask for the fire show.
Squid Roe – touristy but so fun.
Thanks for stopping by to read – hope this helps with your trip planning! And if you’re planning a winter vacation, I linked a few more suits I love here:
Whisk together pudding and milk. Fold in Cool Whip.
Crumble half of angel food cake into the bottom of the 13 x 9 pan. Top with half of the pudding mixture and half of the Butterfinger crumbs. Repeat. Cover and refrigerate until serving.
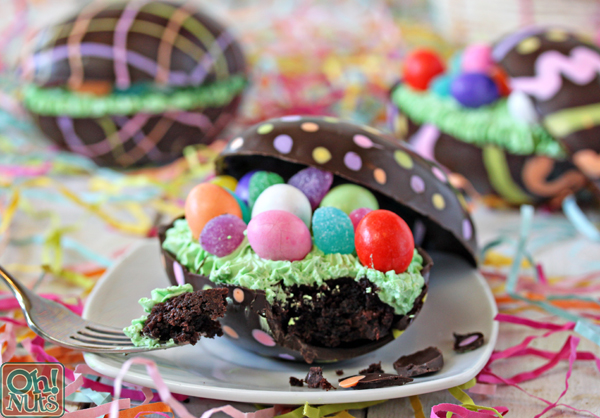
Eggs are everywhere this time of year. Hard-boiled eggs, plastic eggs, jelly eggs…it’s hard to walk five feet in the grocery store without tripping over an egg display! So it’s not surprise that when it came time to brainstorm ideas for a fun Easter dessert, I had eggs on the brain. Although I have nothing against traditional candy eggs, I wanted my Easter dessert to be a little more special than just throwing some jelly beans on top of a cupcake. I wanted this dessert to be a little more egg-ceptional, if you will.
These Brownie-Filled Chocolate Easter Eggs are certainly egg-stra special! (I should warn you that this is not the last terrible egg pun.) They’re gorgeous hollow chocolate eggs, decorated with beautiful colored patterns seamlessly blended right into the chocolate shell. And as the name might suggest, they’re filled with rich, fudgy brownies, decorated with frosting “grass” and topped with an assortment of Easter candy.
Brownie-Filled Chocolate Easter Eggs | OhNuts.com
Each brownie-filled egg is the perfect individually portioned dessert. Display them together for a beautiful Easter dinner centerpiece, then serve them on individual plates with a fork for guests to enjoy! You can also try topping them with whipped cream, ice cream, or chocolate sauce. Ready to make your Easter dessert extra egg-citing? (Okay, okay, I’ll stop.) Here’s what you need to get started!
Mix and bake the box of brownie mix in a 9×9-inch pan according to the package directions. Alternately, you can use your favorite homemade brownie recipe that fits in a 9×9-pan. But since we’re doing so much work to make the chocolate eggs, I suggest taking a few shortcuts when you can! Once the brownies are baked, let them cool while you prepare the chocolate eggs.
Brownie-Filled Chocolate Easter Eggs | OhNuts.com
Divide the colored wafers into small cups by color, and microwave them individually until melted. Stir frequently to prevent the wafers from overheating and scorching. Pour the colored wafers into paper cones or small plastic bags with a small hole snipped in the corner. If you want to try your hand at making parchment paper cones, here’s a photo tutorial showing how it’s done.
Brownie-Filled Chocolate Easter Eggs | OhNuts.com
To make the chocolate egg, you’ll need an egg mold. Look for one that’s about 4 inches long, with a smooth interior, and that has both a top and a bottom cavity–the bottom will be flattened so that the eggs can easily balance on their side. Egg molds can be easily found online, and they are often at many specialty candy supply stores and craft stores around Easter time.
Pipe a design onto the inside of the egg mold. Polka dots and stripes are both easy and look great, but you can get fancier and make any design you like! Remember that if you want to write words, you need to write them backwards so they will be legible once they’re flipped out of the mold. When you are done making your design, keep the bags of colors in an oven that is just slightly warm(not hot), so that they stay liquid in between uses.
Brownie-Filled Chocolate Easter Eggs | OhNuts.com
Refrigerate the mold to set the colored wafer design. While you’re waiting for the colors to set, place the melting milk chocolate wafers into a bowl and microwave them until melted, stirring after every 30 seconds to prevent overheating. Let the melted chocolate cool until it is no longer warm, but is still fluid. It should thicken a bit as it gets closer to room temperature. The warmer it is, the more likely it is to melt the colored design, so ideally it should be as close to room temperature as possible while still having a liquid consistency. When it is the right temperature, pour several generous spoonfuls of chocolate into the egg mold.
Brownie-Filled Chocolate Easter Eggs | OhNuts.com
Use a clean paintbrush to paint the chocolate up the sides of the mold. Add more chocolate if necessary, working until you have a thick layer of chocolate on the bottom and sides of each egg-shaped cavity. Try to keep a thick layer of chocolate on the brush so it doesn’t drag through the colored design underneath.
Brownie-Filled Chocolate Easter Eggs | OhNuts.com
Run an offset spatula or knife around the edge of the egg to remove any excess chocolate and make a clean line. Refrigerate the mold to set the chocolate completely, for about 20 minutes.
Brownie-Filled Chocolate Easter Eggs | OhNuts.com
Once set, turn the mold upside-down a few inches over your counter and gently flex it to remove the chocolate egg. Repeat this process until you have made five chocolate egg shells. Wipe the inside of the mold off between uses so it remains clean and shiny, and reheat the chocolate and bags of colored coating as necessary.
If you have an egg-shaped cutter that’s the approximate size of your egg mold, use that to cut out five egg-shaped brownies. If not, use a knife to cut out egg-shaped brownies.
Gently place a brownie in the bottom of each chocolate egg. Brownie-Filled Chocolate Easter Eggs | OhNuts.com
Mix the frosting with a bit of green food coloring to make a grass color. Transfer it to a piping bag fitted with a star tip, or to a plastic bag with a hole cut in the corner. Pipe the frosting on top of the brownies to resemble grass.
Brownie-Filled Chocolate Easter Eggs | OhNuts.com
Top each brownie with the candy eggs. Finish by carefully placing the top of the egg on each base, and serve! You can also try filling these eggs with cake, mousse, or even ice cream! If you want to keep things traditional, you can simply fill them with candy, pipe a thin layer of chocolate coating on the edge, and press the two halves together to make a hollow chocolate egg with a surprise inside. There are so many ways to enjoy these beautiful eggs! As always a printable recipe and pin-able image are down below. Enjoy!
Mix and bake the box of brownie mix in a 9×9-inch pan according to the package directions. Let the brownies cool while you prepare the chocolate eggs.
Divide the colored wafers into small cups by color, and microwave them individually until melted. Stir frequently to prevent the wafers from overheating and scorching. Pour the colored wafers into paper cones or small plastic bags with a hole snipped in the corner.
Pipe a design onto the inside of the egg mold. Polka dots and stripes are both easy and look great, but you can get fancier and make any design you like! Remember that if you want to write words, you need to write them backwards so they will be legible once they’re flipped out of the mold. When you are done making your design, keep the bags of colors in an oven that is warm but not hot, so that they stay liquid in between uses.
Refrigerate the mold to set the colored wafer design. While you’re waiting for the colors to set, pour the chocolate wafers into a bowl and microwave them until melted, stirring after every 30 seconds to prevent overheating. Let the melted chocolate cool until it is no longer warm, but is still fluid. It should thicken a bit as it gets closer to room temperature. The warmer it is, the more likely it is to melt the colored design, so ideally it should be as close to room temperature as possible while still having a liquid consistency.
Pour several generous spoonfuls of chocolate into the egg mold, then use a clean paintbrush to paint it up the sides of the mold. Add more chocolate if necessary, working until you have a thick layer of chocolate on the bottom and sides of each egg-shaped cavity. Try to keep a thick layer of chocolate on the brush so it doesn’t drag through the colored design underneath.
Run an offset spatula or knife around the edge of the egg to remove any excess chocolate and make a clean line. Refrigerate the mold to set the chocolate completely, for about 20 minutes.
Once set, turn the mold upside-down a few inches over your counter and gently flex it to remove the chocolate egg. Repeat this process until you have made five chocolate egg shells.Wipe the inside of the mold off between uses so it remains clean and shiny, and reheat the chocolate and bags of colored coating as necessary.
If you have an egg-shaped cutter that’s the approximate size of your egg mold, use that to cut out five egg-shaped brownies. If not, use a knife to cut out egg-shaped brownies. Gently place one in the bottom of each egg.
Mix the frosting with a bit of green food coloring to make a grass color. Transfer it to a piping bag fitted with a star tip, or to a plastic bag with a hole cut in the corner. Pipe the frosting on top of the brownies to resemble grass.
Top each brownie with the candy eggs. Finish by carefully placing the top of the egg on each base, and serve!
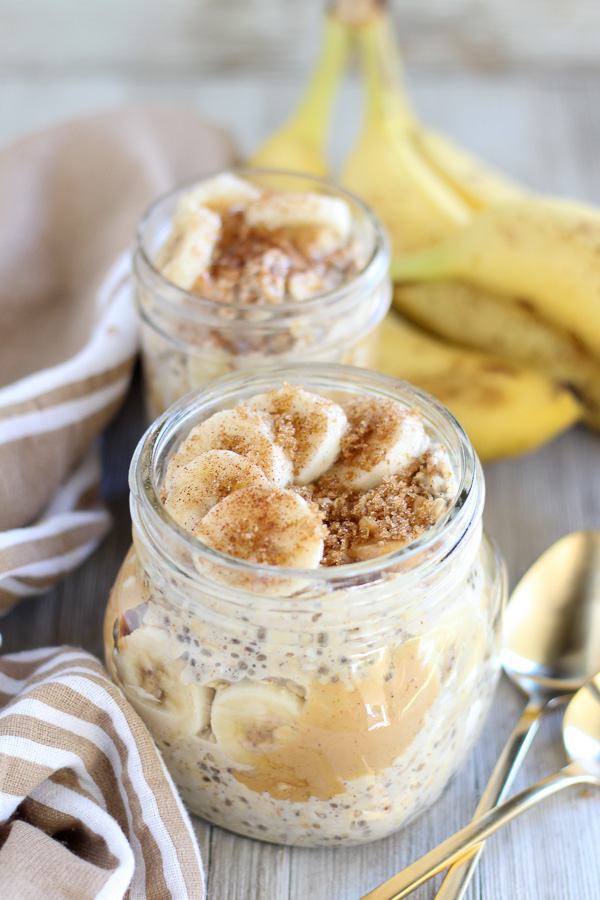
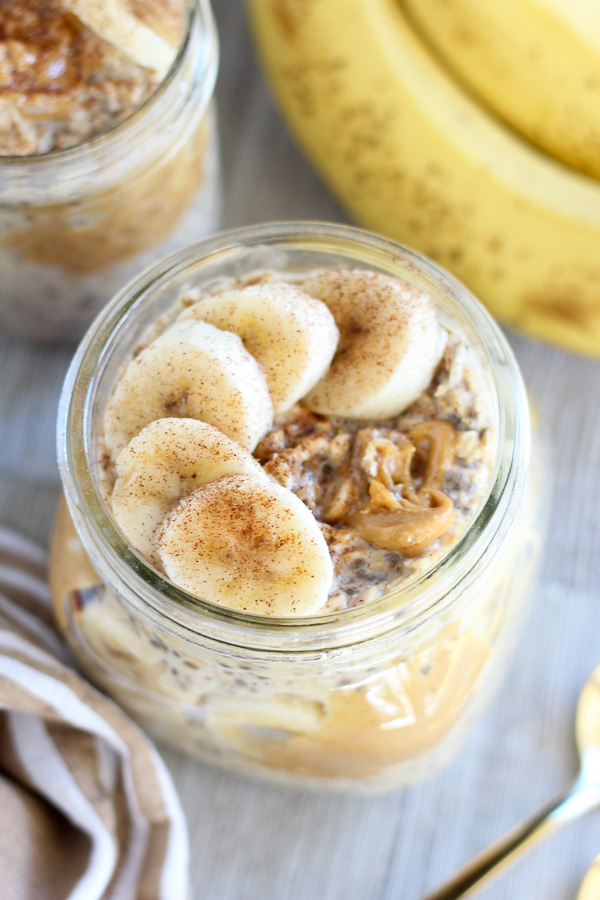
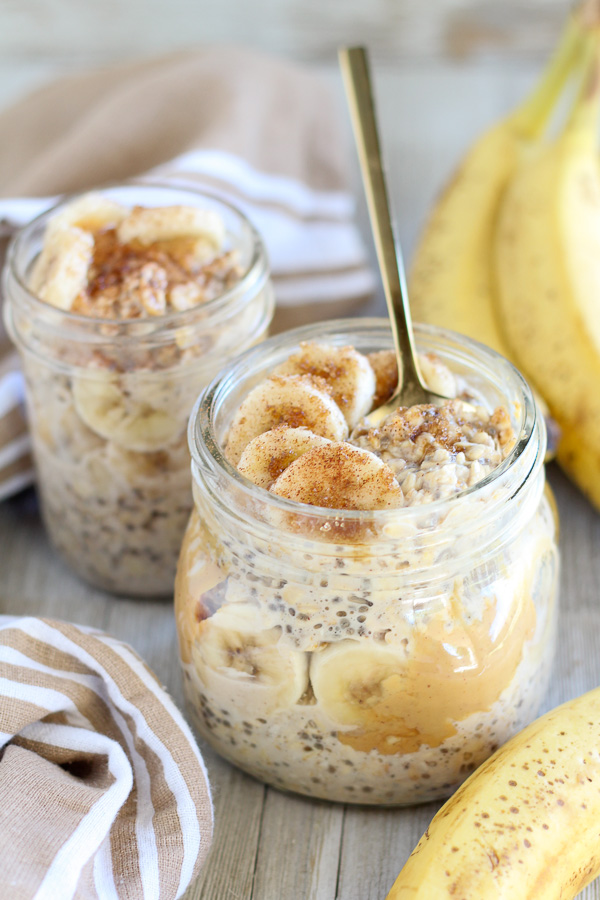
Brown Sugar Banana Overnight Oats is a simple make-ahead breakfast recipe with oats, chia seeds, peanut butter, and bananas. This healthier classic is the perfect grab and go breakfast!
Hello! This is Allison from Celebrating Sweets. Our mornings are hectic so I find myself relying on make-ahead breakfast ideas to get my kids fed and out the door on time for school. I recently began making overnight oats, and my family loves them. There are a million different varieties and flavorings, so it’s fun to get creative with your favorite mix ins and toppings. One of my favorites is my Strawberry Almond Overnight Oats!
These Brown Sugar Banana Overnight Oats are the perfect make-ahead breakfast. It’s a great grab-and-go breakfast for those busy mornings when you are headed to work or school.
What Exactly are Overnight Oats?
Just in case you’re unfamiliar with overnight oats, I’ll explain. You take rolled oats, milk, and flavorings, and combine them in a jar or bowl. They sit in the refrigerator overnight and the oats soften and absorb the liquid and flavorings. The end result is a bowl of oatmeal that is tender and creamy and tastes like it has been cooked even though it hasn’t. You can enjoy the oats warm or cold.
Earlier this year I made a Brown Sugar Banana French Toast Casserole and I fell in love with that flavor combination. I decided to use those flavors in this healthier classic too.
Brown Sugar Banana Overnight Oats
The oats are sweetened and flavored with brown sugar and a touch of cinnamon. Right before serving I stir in peanut butter (or almond butter), sliced bananas, and an extra sprinkling of brown sugar.
I almost always have these pantry staples on hand so I can make these overnight oats whenever we crave a breakfast on the healthy side that tastes more like a dessert!
We hope you love this Brown Sugar Banana Overnight Oats recipe from SoFabFood Home Chef, Allison from Celebrating Sweets, as much as we do. If you like this grab and go breakfast idea, be sure to stop by our Breakfast Section for more like it. For daily recipe inspiration, subscribe to our newsletter, like us on Facebook, and follow us on Pinterest. Enjoy!
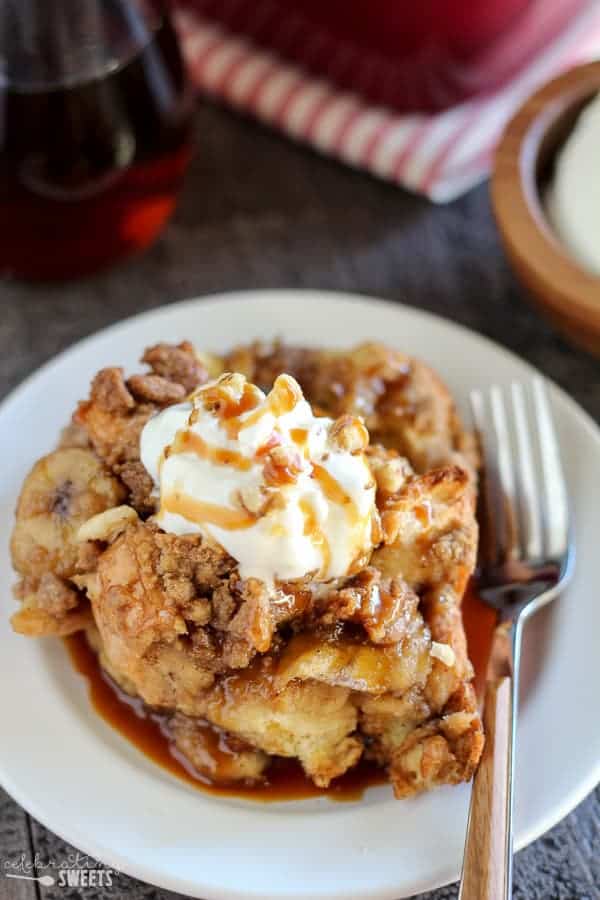
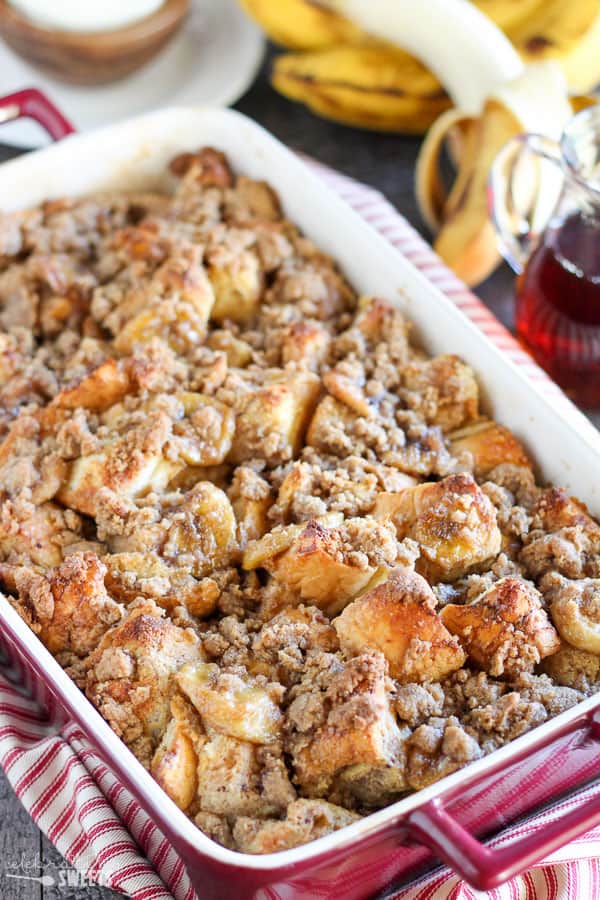
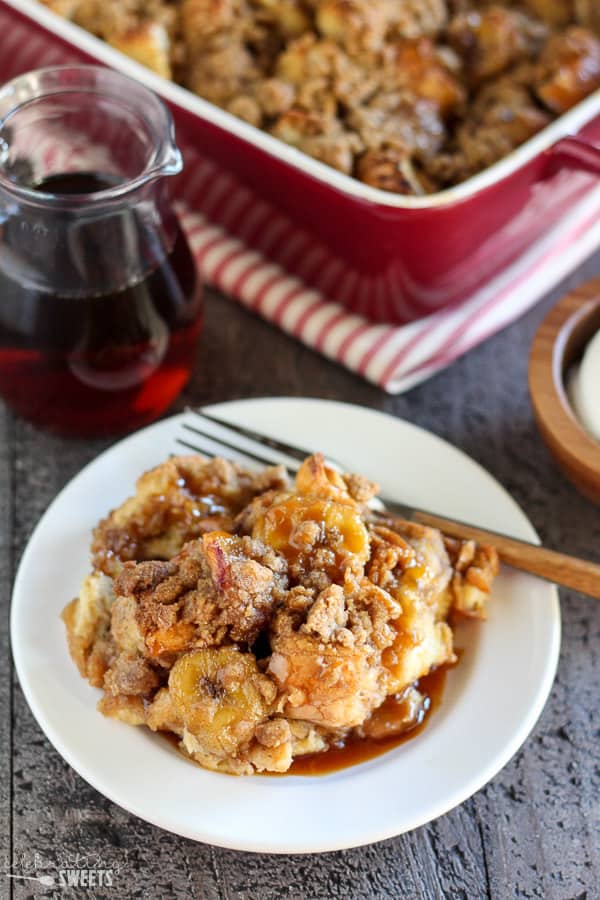
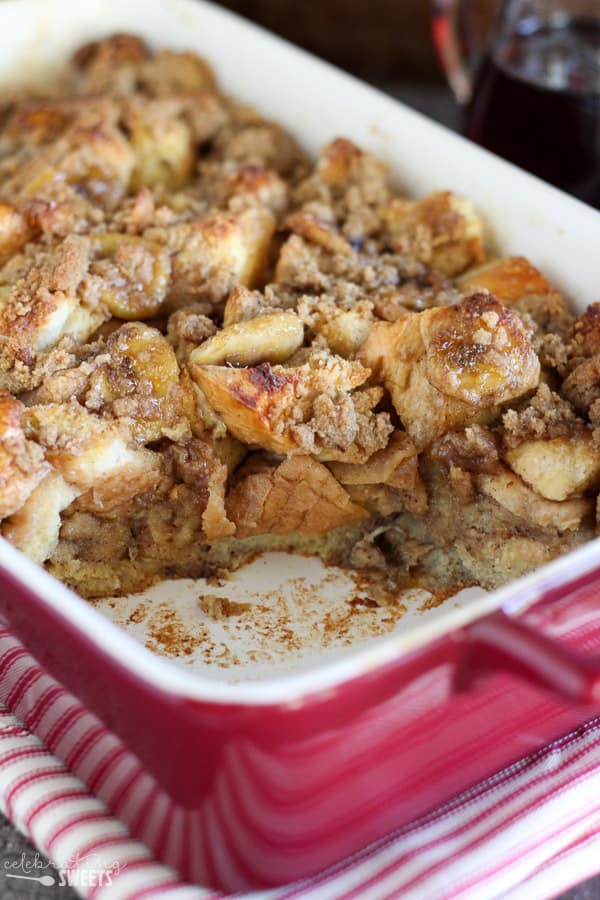
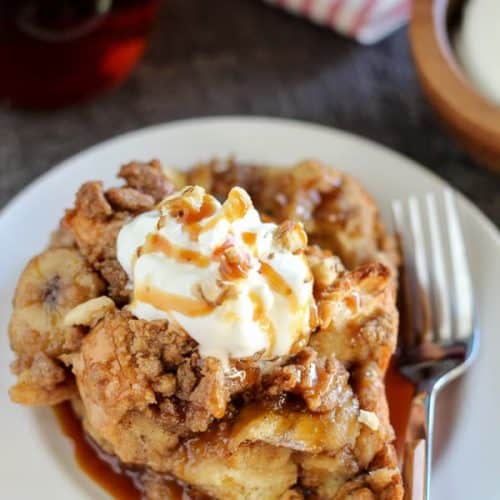
Brown Sugar Banana French Toast Casserole – A make-ahead baked French toast casserole filled with brown sugar caramel sauce, sliced bananas, and a brown sugar crumble topping. Assemble this French toast the night before and bake it in the morning.
With Easter quickly approaching I figured now would be the time to share a fabulous make-ahead breakfast. Today I’m bringing you Brown Sugar Banana French Toast Casserole. Sounds heavenly, right? It most definitely is. It’s a big dish of carby-sweet-caramely-goodness. Comfort food to the max.
Banana French Toast
This Brown Sugar Banana French Toast Casserole is a twist on one of my favorite recipes, Cinnamon Vanilla Baked French Toast. My family always makes French toast casserole for holidays (like Easter and Christmas) when we want a special breakfast but but don’t want to spend the whole morning in the kitchen. All the work is done the night before, so all you have to do is place the French toast in the oven and bake it.
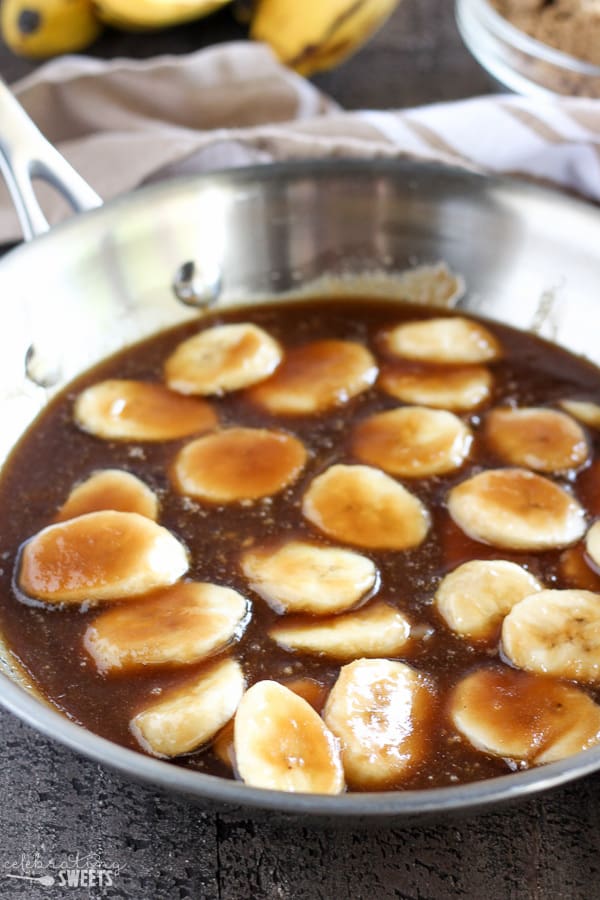
What makes this French toast different from my other version is the addition of brown sugar caramel and bananas. A quick “caramel” sauce is made on the stove top by combining melted butter, brown sugar, and maple syrup. Sliced bananas are tossed in the sauce and then layered between cubes of bread. The whole mixture is topped with an egg and milk custard and then refrigerated overnight. Although there are a few steps, this recipe is really quite easy – and the payoff is huge!
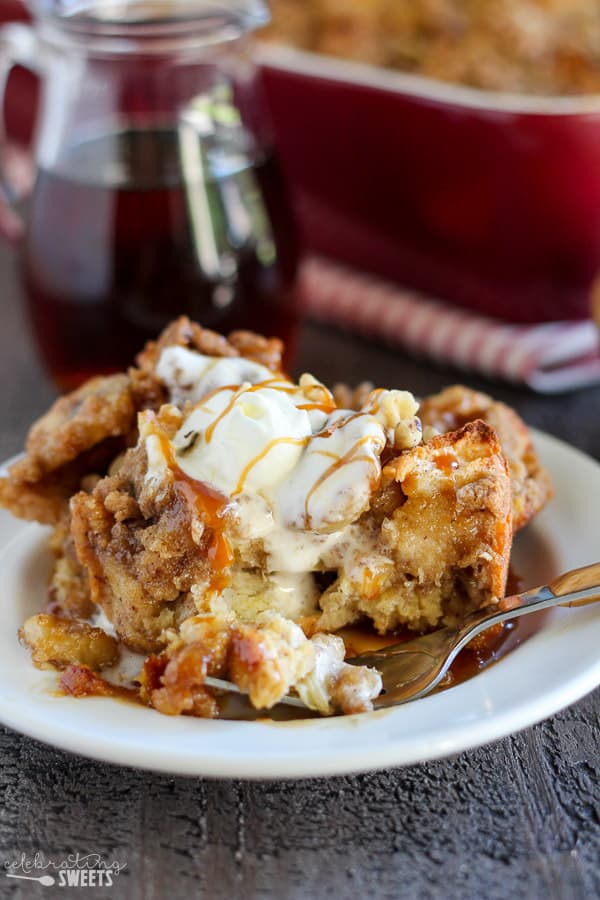
During baking, the French toasts puffs up and turns golden brown. The bread on the inside is tender and the pieces on top get slightly crunchy. Each bite has a sweet and subtle caramel and banana flavor.
This French toast walks a fine line between being breakfast or dessert. The flavors are similar to bananas foster, and it also has a bread pudding quality that could easily help it pass for dessert. But, we’re calling it French toast so we can justify eating it for breakfast. I know you’re with me on this. Dessert for breakfast? OK, twist my arm.
To serve, you can opt to drizzle this French toast with caramel sauce or with maple syrup. I used salted caramel sauce and it was unbelievably delicious. I also topped each serving with a dollop of freshly whipped cream (indulgent much?). Remember, this is an every once in a while/special occasion breakfast. We’re not topping our breakfast with caramel sauce and whipped cream every single morning. But today we are… and we’re going to enjoy every bite.