Black and gold makeup always gives me some Egyptian vibes. I see such looks and imagine ancient pharaohs and gorgeous divine priestesses. And that makeup absolutely loved by modern girls!
I admit, that one color combo looks way cooler on girls with the dark skin and hair.
Though, blondes can use that looks as well.
The most popular combo is, of course, golden eyeshadows + deep black eyeliner. It is the easiest way to create such a rocking look.
The second cool and quite affordable for a girl who learned the ropes about making basic types of makeup - cut crease makeup in golden and black shades.
There are also more sophisticated artistic Avant-Garde looks which are absolutely stunning, and might be a nice choice for some thematic photo-session.
And, for a dessert, a nice subtle black and gold look by Laura Lee ♥
I give you clafoutis. Often spelled clafouti (CLA-FOO-TEE) in the U.S. Clafoutis is a French rustic style dessert that I’ve recently fallen for. It’s somewhere between a cake, a custard and a pancake, 100 percent delicious and ridiculously easy to make.
Jason was sweet enough to point out that “clafoutis” sounds like some kind of vaginal irregularity. And it undeniably does. Actually, I think his exact words were, “you know, like something girls get when they hang out in a wet bathing suit too long.”
Wonderful. Thank you.
Now try to focus on the pretty picture instead…
Traditionally, clafoutis is made with whole cherries, but it’s also great with berries…especially when cherries aren’t in season. I hear people do it with pears, figs, almonds and all kinds of inventive combinations.
Clafoutis was my contribution to Thanksgiving dinner in the dessert category this year. And I must say, when faced with cardiac catatrosphies like chocolate cheesecake, bread pudding and fudge, a light three-berry clafouti is definitely something to be thankful for.
So as I was saying before, this thing is EASY. You basically just blend up the ingredients for the batter, pour it over the fruit and bake for about 45.
I was so psyched about this that I ended up making it again last night to bring to a friend’s house for dinner. This time I used cherries (frozen ones…and I was scared it would suck and everyone would know I was a fraud who serves people simple ass desserts made using frozen fruit…BUT nobody noticed, there were no leftovers and Jason said he liked it even better than the one with the real berries).
Serves 6–8, Recipe adapted from Julia Child. Clafoutis is delicious with many different fruits as well. Try with peaches, plums or cherries.
You need:
1 ¼ cups milk
½ cup sugar
3 eggs
½ cup flour
¼ teaspoon salt
1 Tablespoon vanilla
¼ teaspoon lemon zest
1/8 teaspoon cinnamon
2 cups cherries, pitted or any berries
Small carton whipping cream (optional) and ¼ cup sugar
Directions
Preheat oven to 350°
In a blender blend the milk, 1/3 cup of the sugar, eggs, vanilla, salt, lemon zest, cinnamon and flour.
Pour a ¼ inch layer of the batter in a lightly and evenly buttered fireproof baking dish. Place in the oven until batter firms up a bit (a film will set in the pan). Remove from the heat and place the berries/cherries over the batter. Sprinkle on the remaining sugar. Pour on the rest of the batter evenly.
Bake at 350° for about 45 minutes to an hour. The clafouti is done when puffed and brown and a knife plunged in the center comes out clean. Great served warm or room temperature. Refrigerate leftovers.
Fresh whipped cream is optional, but highly recommended! Pour small 4oz carton of whipping cream in blender with about ¼ cup sugar. Blend until fluffy.
You should definitely enjoy it with freshly made whipped cream!
I have always been a fan of banana splits. The perfect combination of banana, ice cream, and whipped cream. Of course, chocolate sauce and a cherry to top it off! Holy Yum!
However, as a Weight Watcher member who would like to make goal in the next century this year, banana splits are out of the question.
The other day I was craving something sweet but Weight Watchers friendly. I remembered an old recipe I had from a long time ago (2005) and I dug it out of my recipe binder. The original recipe was found HERE.
After a few minor tweaks, the recipe turned out delicious! My husband is VERY leary of “healthy” dessert recipes. Before he will eat it, he asks if there is tofu in it or anything “weird.” I assured him there wasn’t so he tried it.
After he finished licking the plate eating his piece, he said, “Husband approves!”
This pie is a yummy blend of bananas, strawberries, pudding, cool whip and chocolate sauce. It tastes oddly just like a bite of banana split with MUCH fewer calories and fat. An added bonus is how easy it is to make!
I hope you will try this and love it as much as we do!
You MUST make this!
Banana Split Pie
Yields: 8 servings
Weight Watchers Points Plus:
8 servings with fruit counted (6 points plus)*
8 servings without fruit counted (5 points plus)*
Ingredients:
One lowfat Graham Cracker Pie Crust
1 large Banana
1 cup sliced Strawberries
1 small package sugar free/fat free cheesecake (or vanilla) pudding
2 cups of Fat Free Milk
8 ounces fat free Cool Whip
Chocolate Sauce
Directions:
In the graham cracker pie crust, layer the banana and then the sliced strawberries.
Prepare the pudding according to package directions.
Pour the pudding over the banana/strawberry layer.
Refrigerate until the pudding set.
Top with the cool whip – If you are going to serve the whole pie at one time, top the whole pie. If you are going to eat the pie over the course of a few days, top each slice as you eat it.
Drizzle chocolate syrup (sugar free or light will save calories) over the pie.
Enjoy every bite! We sure did!
*On the Weight Watchers program, fruit is considered “free” unless it is used in a recipe. If you use fruit in a recipe, Weight Watchers encourages you to count the points plus for the fruit. This is left up to the individual. I find that if I haven’t had much fruit that day, I won’t count it. If I have had 2-3 servings, I will count it. It is up to you!
Traditional banana pudding is missing just one thing — rum! These bite size treats are perfect the perfect dessert for your next outdoor bbq. Just be sure to set yourself a limit because they are addicting!
Have you made these yet? Let us know how it went in the comments below!
In a large bowl, combine pudding with milk and rum and whisk to combine. Fold in chopped bananas.
Spoon or pour pudding mixture into shot glasses until they are half full. Add a layer of crushed Nilla Wafers in each shot glass, about 1 1/2 teaspoons in each. Top with remaining pudding.
Garnish each pudding shot with a dollop of Cool Whip, a sprinkle of the remaining Nilla Wafers, and a slice of banana. Refrigerate until ready to serve,
This content is imported from {embed-name}. You may be able to find the same content in another format, or you may be able to find more information, at their web site.
This content is created and maintained by a third party, and imported onto this page to help users provide their email addresses. You may be able to find more information about this and similar content at piano.io
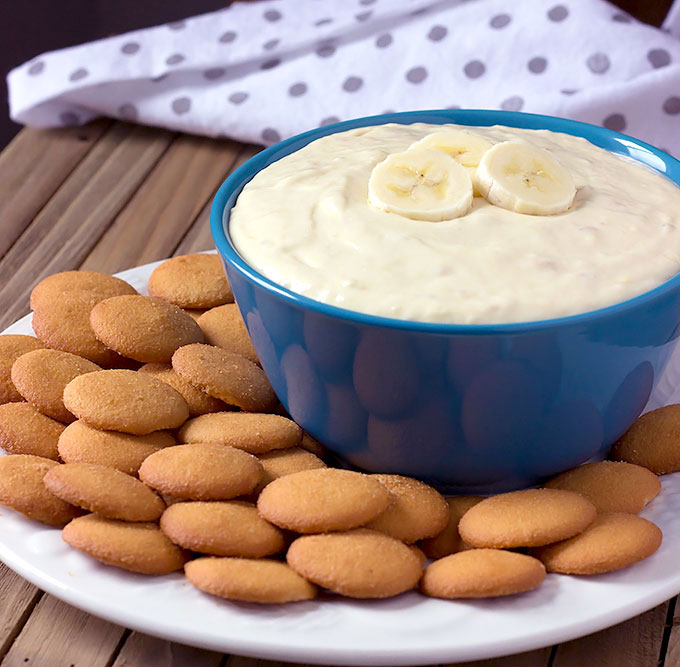
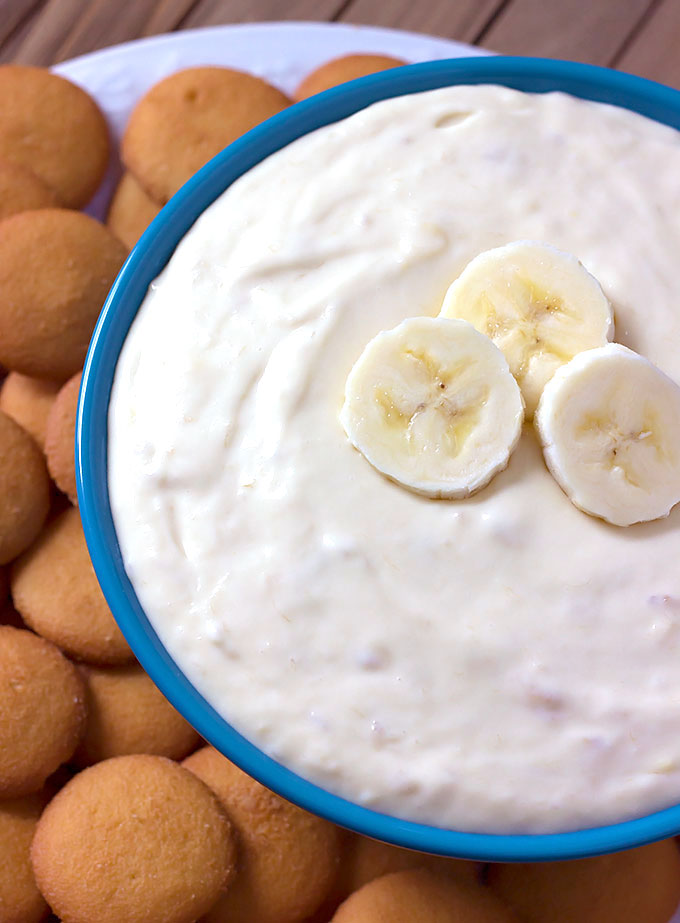
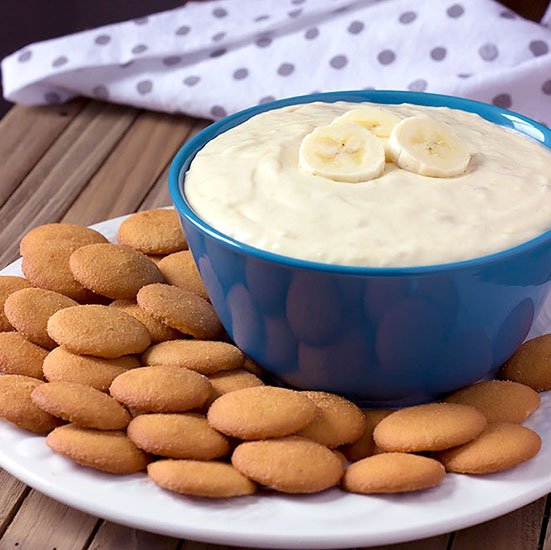
Banana Pudding Cheesecake Dip is an easy dessert recipe for a crowd.
Banana Pudding Cheesecake Dip is perfect if you need to make a ton of dessert for a bunch of people. It makes a lot. It’s pretty easy too. Just blend cream cheese, powdered sugar, vanilla pudding, and ripe bananas with a mixer. Then, serve the dip with vanilla wafers.
Bahama Mama cupcakes turn your favorite summertime drink into the perfect dessert. One bite and you'll feel like you've had the beach vacation of your dreams. Have a Bahama Mama cupcake in one hand and Margarita cupcake in the other!
Have you made these yet? Let us know how it went in the comments below!
Preheat oven to 350° and line two cupcake pans with 18 cupcake liners. Stir cake mix with Sprite and orange zest until thoroughly combined. Fold in toasted coconut. Divide batter between liners and bake according to package instructions. Let cool completely before frosting.
Make rum frosting: In a large bowl, beat together butter, half the powdered sugar, pineapple juice, and rum. Add the rest of the powdered sugar and beat until fluffy.
Pipe cooled cupcakes with rum frosting then garnish with orange wedges, maraschino cherries, and cocktail umbrellas.
This content is imported from {embed-name}. You may be able to find the same content in another format, or you may be able to find more information, at their web site.
This content is created and maintained by a third party, and imported onto this page to help users provide their email addresses. You may be able to find more information about this and similar content at piano.io
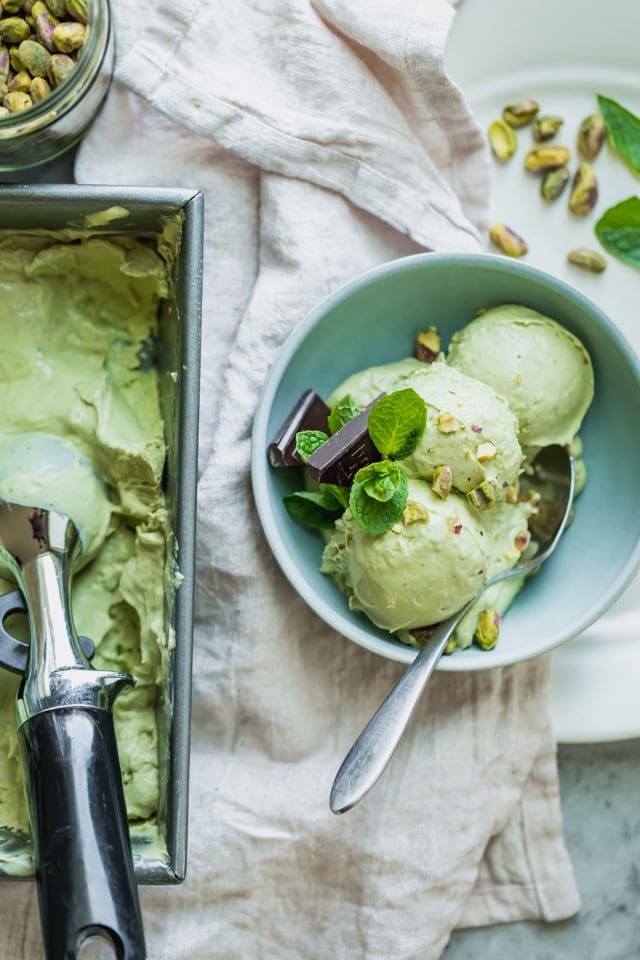
If you’re looking for a homemade easy vegan dessert, you need to try avocado ice cream. I know what you’re thinking, avocados and ice cream together? But it totally works, just like you can add avocados to smoothies. Avocados have a smooth and naturally creamy texture makes it such a perfect candidate to throw in smoothies, mousses and even ice cream. And the best part is you don’t need an ice cream maker to whip up this vegan treat!
How to make avocado ice cream
There are some simple versions of this recipe that basically use avocados, heavy cream, sugar and lemon juice (to prevent the avocados from browning). My version is pretty similar to the general ones, but I also add bananas for some sweetness and I used canned coconut milk to make this vegan and paleo friendly.
You’ll need 2 ripe avocados to start along with fresh mint leaves and a couple tablespoons of lemon juice.
Next, add those ingredients all together along with canned coconut milk, a ripe banana and maple syrup to sweeten it. When you blend it, it will look like a super thick vibrant green smoothie, and that’s exactly what we’re looking for!
When the mixture is smooth and consistent, transfer it form the blender to a loaf pan, and freeze for 4 hours. And then you’ve got homemade avocado ice cream! The waiting part is the hard part.
There may be some discoloration on the top after you freeze the avocado ice cream, but a tightly wrapped plastic touching the ice cream will usually help eliminate that problem.
Avocado ice cream variations
Don’t like mint? Leave it out!
Want to make this into a mint chocolate chip ice cream? Double the amount of mint leaves and fold in chocolate chips in the end!
Craving some chocolatey? Add 2 tablespoons of cacao powder to the recipe to make Chocolate Avocado Ice Cream.
Want to add a citrus flavor to it? Blend 1 tablespoon of lemon zest or orange zest, or combination of the two into the blender.
Love nuts? Chop them finely and fold them in right before freezing. I love adding pistachios or almonds to this.
Tips for making avocado nice cream
Make sure to cut the bananas before freezing them. This makes it much easier for the blender or food processor to break down and churn the bananas quickly before it turns into a smoothie.
Freeze the ice cream container before adding ice cream to it. It’s hard to remember, but if you can do this for 24 hours before you add the ice cream mix to it, it will really help improve the consistency.
Work quickly to transfer the ice cream. Try to scoop it from the food processor bowl to the ice cream container as quickly as possible. That’s because fast freezing help minimize ice crystals.
For more vegan desserts:
If you’e never made ice cream before and you don’t have an ice cream maker, don’t be intimidated. All you need is a good blender, super ripe avocados and a few other basic pantry items.
If you’ve tried this healthy-ish feel good Avocado Ice Cream recipe or any other recipe on FeelGoodFoodie, then don’t forget to rate the recipe and leave me a comment below! I would love to hear about your experience making it. And if you snapped some shots of it, share it with me on Instagram so I can repost on my stories!
This past month I blasted the blog with gluten-free recipes galore. I tried to cover all occasions.
For your everyday, I made Gluten-Free Chocolate Chip Cookie Bars. I pack these in the morning and can't wait to eat them. They're full of great ingredients and a sinch to make.
Now I'm back baking with wheat and thought I'd also give my chocolate stash and my butter bank a break! Apricots are coming into season and they are a beaut to bake with. Gently cooked apricots take on a gnarly jammy flavour and retain their moist, almost creamy texture.
This is a Southern Italian recipe featuring olive oil instead of butter. The baked cake has a super moist and spongy texture and comes together in minutes. It's a one-bowl + one saucepan deal.
Almonds make a very welcome presence in this recipe. They pair wonderfully with stone fruits like cherries and plums - apricots are no exception.
Chillin' in the background of the olive oil (I use extra virgin) are perfumes of lemon and vanilla bean. To get the most of these flavours, we need to infuse them into milk and let it steep. It needs to cool before we combine it with the rest of the ingredients to make a smooth and silky batter.
This cake really couldn't get more Italian with all its Mediterranean flavours. It is bright and light and suited to breakfast, brunch or dessert. I'd serve it with some Greek yogurt or ricotta and a drizzle of honey, or some vanilla bean ice cream.
Try to use apricots that are on the larger side so that the slices take up more surface area and don't get buried by the batter as they sink into it during baking. Although, who could blame them for sinking too deep - I'd like to sink right in myself...
And no need to poke them in, because of the sinking thing... you know? Just lay them on the surface and it will all take care of itself.
As much as I adore butter, olive oil (and any liquid oil in general) has the advantage of staying liquid at cold temperatures so that you can refrigerate this cake and it will still be soft and moist straight from the chiller. It keeps well for about a week. But, I'm not sure if that matters because it doesn't normally live to see the third day. Sorry cake, I'm hungry.
1/3 cup plus 1 tbsp (100 ml) extra virgin olive oil
2 eggs, lightly beaten
1 1/3 cups (190 g) all-purpose flour
1 ½ tsp baking powder
½ tsp baking soda
¼ tsp salt
5-6 apricots, cut into quarters
flaked almonds, for sprinkling
Preheat your oven to 350°F/180°C. Lightly butter and flour a 9x9 inch round springform cake pan and line the base with parchment paper.
Place the sugar, milk, lemon zest and scraped vanilla bean seeds with the pod in a medium saucepan over low heat and bring just barely to a simmer while stirring frequently to dissolve the sugar. Do not let it boil. Remove from heat, cover and set aside for 15 minutes to infuse and cool down.
In a large bowl, sift together flour, baking powder, baking soda and salt. Whisk through ground almonds. Add the olive oil, beaten eggs and cooled milk mixture and whisk gently to form a smooth batter.
Pour the batter into the prepared pan and arrange the apricot quarters on top any way you like. Sprinkle with the flaked almonds and bake for 30–35 minutes or until golden brown and a skewer inserted into the center of the cake comes out clean. Transfer to a wire rack to cool in the pan for 10 minutes before removing the sides and leaving to cool completely.
If you are using very small apricots, they may plummet to the bottom of the tin during baking. To avoid this, make a double layer of apricot quarters.
This opens up my mind to all of the different ways you could stuff an egg roll; why not dessert?! Serve this up with a scoop of ice cream or whipped cream and you’ve got a unique treat that everyone is sure to love. And the best part is they’re baked, not fried! Hop on over to Tasty Kitchen for the recipe and baking instructions!