I love reading Mutts! It's one of my favorite Sunday cartoons. And this one is so true- there's always room for one more piece of pumpkin pie or on this cake pumpkin pie cake. This is a dessert I made along with Chocolate Chip Pecan Pie to take to my MIL's for Thanksgiving dinner.
Ingrid of 3B's reminded me of this wonderful pumpkin dessert. She called me up one day oohing and ahhing over a recipe called pumpkin cobbler. I thought "ooh that sounds interesting" and the more she described it I knew exactly what she was talking about. She was talking about a recipe I had tried several years ago that I called Pumpkin Pie Cake. I've seen people call it pumpkin crunch and pumpkin dump cake. Whatever you call it, I'm sure you'll agree with me that it is delicious.
This is a very simple recipe that consists of a couple small cans of pumpkin, a few eggs, a can of evaporated milk, spices, a box of yellow cake mix, butter and nuts. It's basically a pumpkin pie custard on the bottom, then you sprinkle a cake mix over the pumpkin, then drizzle butter over it. Top with nuts if desired. It's delish! Thank you Ingrid for reminding me about this dessert!
The custard is creamy just like the pie minus the crust and the topping is crunchy, buttery, sweet, and nutty. I like it cold just like my pumpkin pie but it's equally good at room temperature. The hardest part is waiting for the cake to cool completely. And this dessert stays fresh for several days. A double bonus.
Most classic desserts contain carbs, often in the form of added sugar and white flour in cookies, cakes, and tarts. It can be difficult, but not impossible, to come up with creative and tasty no carb desserts. You will need to use sugar substitutes like Splenda or Stevia, and in place of flour you can use almond meal or another nut-based flour. In general, look for dairy-based desserts like cheesecake, as these will be high in protein and low in carbs.
1. No Carb Cheesecake
No Carb Cheesecake is a great choice for low carb dieters, as it consists mostly of cheese and eggs. And no crust!
Cheesecake gets baked in the oven but then must cool for two to three hours in order for it to set and hold its shape. Here are two basic no carb cheesecake recipes for you to try.
Click to Print Recipe
Simple No Carb Cheesecake
Net Carb Count: 0 grams
Ingredients:
5 Packages Light Cream Cheese
4 Eggs
2 Tablespoons Lemon Juice
¾ Cups Splenda
Directions:
Combine ingredients in a bowl.
Mix everything together until it is smooth, then bake at 325 degrees Fahrenheit in a greased pie plate for one hour.
Click to Print Recipe
Flavored No Carb Cheesecake
Net Carb Count: 0 grams
Ingredients:
8 Ounces Cream Cheese
2 Eggs
3 Ounces Sugar-Free Gelatin Mix of Your Preferred Flavor
Directions:
Combine ingredients in a bowl.
Mix everything together until it is smooth, then bake at 350 degrees Fahrenheit in a greased pie plate for 30-40 minutes.
2. No Carb Pudding
This carb-free pudding has less than one gram of net carbs per serving.
Click to Print Recipe
No Carb Pudding
Net Carb Count: 0 grams
Ingredients:
2 Tablespoons Heavy Whipping Cream
Artificial Sweetener to Taste
1 Teaspoon Vanilla Extract
Directions:
In a small bowl, combine heavy whipping cream with vanilla extract and your favorite artificial sweetener to taste.
Beat with an electric mixer until stiff peaks form.
3. Sugar-Free Hot Cocoa
This cocoa will warm you up on any cold winter evening. The net carbs in this hot cocoa are virtually nonexistent, at less than half a gram.
Sugar-Free Hot Cocoa
Net Carb Count: < ½ gram
Ingredients:
1 Teaspoon Unsweetened Cocoa Powder
¼ Cup Water
Artificial Sweetener to Taste
Directions:
In a small saucepan, whisk together unsweetened cocoa powder with water until hot.
Sweeten, if desired, with your favorite artificial sweetener.
4. Cheese
Cheese is naturally low carb; one ounce of cheese has less than half a gram of net carbs. Enjoy an ounce or two of nice cheese after dinner for a guilt-free dessert.
5. Low Carb Mousse
This mousse is similar to no carb cheesecake, but has no eggs and thus does not require baking. Because of the cheeses used in this mousse, there are about four grams of net carbs, so it is not completely carb-free.
Click to Print Recipe
Low Carb Mousse
Net Carb Count: 4 grams
Ingredients:
½ Cup Ricotta or Cottage Cheese
Artificial Sweetener to Taste
Cinnamon to Taste
Nutmeg to Taste
Ginger to Taste
Directions:
Put ricotta or cottage cheese in a blender with some artificial sweetener to taste
Add your favorite combination of cinnamon, nutmeg, and ginger.
Blend until smooth and chill before serving.
It is hard to create a completely carb-free dessert, but the ideas above come quite close, most having less than one gram of net carbs per serving. Remember that dessert does not have to be sweet; cheese is a common finisher in many countries, and it’s a great choice for the low carb dieter. Get creative, too; you can make no carb cheesecake in a variety of ways, and you can flavor pudding and mousse with various spices and extracts without adding carbs. Get in the kitchen and try your hand at one of these no carb desserts!
Click on the picture below To save this recipe to remember it
These super easy to make keto brownies are super low in carbs, fudgy and have a dense and creamy texture that melts in your mouth. To make the brownies, we use almond flour, chocolate, butter and they are the best low carb dessert ever – only 2g carbs.
In less than 40 minutes you have the perfect keto brownies that are the ideal company for a cup of keto coffee or your favorite tea.
Brownies are one of my favorite keto desserts, chocolatey and chewy. You’ll be surprised to find out that the ingredients we are using are low in carbs and super easy to find. You’ll need only seven low carb ingredients:
almond flour
keto approved sweetener/paleo sweetener
high-quality dark cocoa
dark chocolate (99 percent would be perfect)
butter, grass fed to make the brownies healthier
eggs, to bind everything up
a pinch of baking powder
The brownies are sugar-free, gluten-free and with a few switches, you can make them paleo compliant too.
They last for a week in the refrigerator. You can also freeze the brownies and eat when craving a chocolatey keto dessert.
If you want to use a different sweetener, just taste test and adjust it to the desired taste.
Ingredients:
1/2 cup almond flour
3 eggs at room temperature
12 tbsp butter softened
1/4 cup dark cocoa powder
2 oz dark chocolate
3/4 cup erythritol
1/2 tsp baking powder
Instructions:
Preheat oven to 350 degrees F (175 degrees C).
Line with parchment paper an 8×8-inch baking pan covering the bottom and the sides.
In a bowl mix the butter and the dark chocolate. Microwave for 30 seconds or let the mixture melt on a double boiler.
In a big bowl beat the crack the eggs and beat them with the mixer.
Add the butter and chocolate mixture and continue mixing.
Slowly mix in the dry ingredients, until you get brownies batter consistency.
Transfer the batter to the baking pan and bake for 15-20 minutes. Depending on the oven you have the baking time may vary. You’ll want to check the brownies from minute 15 to make sure you aren’t overbaking them. The center has to be slightly moist when touching.
NOTES:
Can you replace almond flour with coconut flour?
For this recipe and the sake of great texture, I don’t recommend using coconut flour. Coconut flour absorbs liquid very quickly and you may end up with dry keto brownies. However, I’ve got another great keto brownie recipe with coconut flour for you.
Eating healthy fats, the correct way is extremely important in order to maintain a healthy lifestyle, but it’s even more important when looking to maintain a ketogenic or a low carb diet, where your fat intake should make up around 70%-80% of your daily caloric intake.
Trying out a new diet plan can be extremely frustrating at times, especially if you’re not exactly certain why you’re not seeing results. However, participating in a proper diet can lead to a healthier and happier lifestyle.
Being successful on the keto diet is mainly determined by one simple fact: how much fat you’re consuming. Eating enough fat on the keto diet helps to keep you satiated for a longer period of time (versus carbohydrates), as well as the fight against your cravings.
The ketogenic diet is a great resource for people to use if they’re looking to produce more ketones. However, being successful on the ketogenic diet requires that you consume a lot of fat because ketosis works by changing your metabolism by using a fat as an energy source, instead of carbohydrates.
When cutting back on your carbohydrate intake, you’re going to want to look to fuel your body with fat instead of carbohydrates. You should be looking to eat enough fat at your meals that you aren’t feeling hungry for at least four hours after eating. Look to feel satisfied and not overly stuffed, but make sure that you really pay attention to your body and work to find this balance.
One of the things I really like about Metabolic Factor is that it takes a multi-disciplinary approach to health. It's not JUST about nutrition. This quiz really opened my eyes to factors that may be preventing my KETO weight loss .
I earn a commission if you click this link and make a purchase at no additional cost to you.
Good Fats vs Bad Fats
You should understand that not all fats are good fats, so even on the keto diet, you can still eat bad fats. Good fats are saturated fats, monounsaturated fats, natural trans fats, and natural polyunsaturated fats. Thankfully, the list of bad fats is much shorter and easier to keep track of; bad fats include processed polyunsaturated fats and processed trans fats.
Most of your daily fat intake should consist of monounsaturated and saturated fats. Fat is recognized by the amount of that’s dominant in the mixture. For example, Extra Virgin Olive Oil contains around 73% monounsaturated fats, so it’s considered a monounsaturated fat. On the other hand, butter is around 655 saturated fat and is considered a saturated fat.
Good fats:
Saturated Fats
Saturated fats are on the list of good fats and can be found in red meat, lard, cream, butter, palm oil, coconut oil, and eggs. Unfortunately, saturated fats have gotten a bad rap in the last 50 years, as many people believe that saturated fats are the main cause for obesity and coronary heart disease, but there have been many recent studies that have shown that have shown that saturated fats do not increase cholesterol levels.
Saturated fats have the longest shelf life compared to all other fats, which means that they’ll keep for a long time once you’ve bought them (as long as you store your saturated fat foods properly).
Through recent studies, saturated fats have been shown to have the following benefits when combined with the keto diet:
Improved HDL to LDL ratio
Maintain bone density
Boost immune system health
Improve HDL and LDL cholesterol levels
Support cortisol and testosterone levels
Raise HDL (good) cholesterol while also helping to prevent buildup of LDL (bad) cholesterol levels
MCTs
MCT stands for medium-chain triglycerides and is saturated fats that our bodies can easily be digested. MCTs are mainly found in coconut oil and tend to digest in our bodies differently than any other oil.
Matter of fact, MCTs pass directly through the liver when ingested and are immediately used in the form of energy for the body. Medium-chain triglycerides are also found in butter and palm oil but are in much smaller quantities than found in coconut oil.
Eating polyunsaturated fatty acids on a ketogenic diet isn’t bad, as long as you’re eating the right type of polyunsaturated fats. When heated, polyunsaturated fats can form free radicals, which can lead to an increased risk of heart disease, heart attacks, stroke, and cancer in the body. However, as long as you consume polyunsaturated fats cold and don’t use them for cooking, they’re a healthy source of fat.
On top of being a healthy source of fat, healthy polyunsaturated fats can include essential omega 3s and omega 6s. However, you should keep an eye on your ratio of omega 3s to omega 6s, which should be a ratio of 1:1; most western diets have an average ratio of 1:30.
Having a healthy balance of omega 3s to omega 6s can help to reduce the risk of:
Stroke
Heart disease
Improve the symptoms of depression
Improve focus on patients with ADHD
Autoimmune disorders and inflammatory disease
Monounsaturated fats
Monounsaturated fats are found in extra virgin olive oil, avocado oil, macadamia nut oil, beef, olives, and avocados. This fat is known to be used to prevent heart disease, while also helping to encourage the body to burn through fat profiles faster. Oils that are high in monounsaturated fats such as avocado oil, extra virgin olive oil, and macadamia nut oil are best for cold use or for after cooking. You can read more about the best nuts to eat on Keto here.
Monounsaturated fat’s healthiness has never been questioned and is well-known for being a healthy fat. The health benefits of monounsaturated fats while on the keto diet can include:
Increase HDL cholesterol levels
Lower blood pressure
Reduced fat around the abdomen
Reduced insulin resistance
Lower risk for heart disease
Bad fats:
Hydrogenated oils, trans fats, canola oil, soybean oil, grapeseed oil, corn oil, margarine, processed vegetable oils, sunflower oil, and safflower oil are all oils that should be limited or completely avoided because they are damaging to your health. Processed oils and trans fatty acids:
Are often compared with genetically modified seeds
Oxidize during high-heat processing, which creates free radicals
Consumption of trans fats increases the risk of coronary heart disease, stroke, and obesity
Creates inflammation in the body and are bad for the health of your gut
Are associated with an increased risk of cancer
Do your very best to limit the number of bad fats that you’re consuming in your diet, even while you’re on the keto diet.
Polyunsaturated fats
Polyunsaturated fats can be found in soybean oil, grape seed oil, peanut oil, corn oil, sesame oil, sunflower oil, and canola oil. This fat is called ‘poly’ because it contains many double bonds which happen to react with oxygen when they become heated, forming harmful compounds like free radicals.
This process creates free radicals in the body, which increases inflammation in the body, while also increasing the risk of cancer and heart disease. When consuming your polyunsaturated fats, just make sure you’re not heating them up or using them to fry.
Consuming Polyunsaturated fats can include the following risks:
Reduced HDL cholesterol and increased LDL cholesterol
Cause inflammation in the body
Cause poor health in your gut
Increased risk for heart disease
Increased risk of cancer
Good Fats
Bad Fats
Monounsaturated fats
Processed Polyunsaturated fats
Saturated fats
Processed trans fats
How do I eat more fat?
When I first started on the keto diet, I felt like I needed to eat nothing but fat, which isn’t the right way to get yourself into keto. I quickly made myself sick because I was eating nothing but food that was soaked in butter, which made everything greasy! However, after doing a bit of research on how to eat more fat without making myself sick, I came across some useful tips!
Lorem ipsum dolor sit amet, consectetur adipiscing elit. Morbi auctor suscipit magna pretium sodales. Vestibulum eu lorem vitae diam ullamcorper viverra in vitae nunc. Duis non risus urna.
1. Use full-fat ingredients
The first step you’re going to want to take when looking to increase your fat intake is to stop eating low-fat and fat-free products, including products such as dairy, peanut butter, egg whites, and sour cream. You’re going to want to work on stocking your pantry and your fridge with whole foods, like avocados, salmon, fatty cuts of meat, and eggs. The ultimate end game is to add more natural fat to your diet.
2. Cook with fat
Start cooking your meat, fish, eggs, and vegetables in natural fats, like butter, coconut oil, or olive oil. That will not only help to make your meats less dry, but it will also help to add some flavor to your dishes. However, you should know that using different types of fats will make certain dishes taste different.
If you’re not looking to be too adventurous with your foods, you can use butter. However, if you’re looking to add a bit of an Asian flair to your dishes, try using a peanut oil or a sesame oil. Even using animal fats, like duck fat, lard, or tallow fat are completely fine to eat on the keto diet.
3. Top dishes with fat
Whether you’re eating a salad, a bunless burger, or a piece of steak, add a dressing to your meal. It doesn’t matter if you’re using an actual dressing, an oil, mayo, gravy, or sour cream with your dish, just make sure that you’re topping off your meals with a fat-rich option.
4. Introduce fat bombs into your diet!
Fat bombs are small snacks that can be either savory or sweet and serve as a great tool in the ketogenic diet because they’re high fat and low in carbs. You can consume fat bombs for a fast breakfast on the go, a mid-afternoon snack, a post-workout snack, or for dessert!
Fat bombs are typically created with coconut oil or coconut butter, but some savory fat bombs are created with bacon fat or avocado. Here’s a quick recipe for chocolate fat bombs!
Two ingredient chocolate fat bombs:
You’re going to need:
50 grams of dark chocolate (I would suggest using 85% cacao)
1/3 cup coconut oil
What you’re going to need to do:
Melt your dark chocolate in your microwave, typically takes 2-3 minutes
Melt your coconut oil in your microwave, typically takes 3-4 minutes
Mix the dark chocolate and the coconut oil together, gently mixing the two together
One mixed thoroughly, let the mixture cool slightly. You’re not going to want to let the mixture set, but you’re going to want to let it cool enough so that you can handle the mixture without getting burnt.
Once cool enough to handle, fill a candy mold with the mixture
If you don’t own a candy mold, you can purchase one from WalMart for $5
Place in the freezer to harden
Once frozen solid, pop the fat bombs out of the mold
Enjoy!
The Final Cut
When looking to consume more fats on your ketogenic diet, your main goal should be to consume fats that are unprocessed as possible. Avoid fats and oils that are found in packaged foods, that are processed, or that have been heated up.
The entire purpose of participating in the ketogenic diet is to improve your overall health, by maintaining the proper fat, protein, and carbohydrate ratios, but by also consuming food sources that are healthy. Consuming healthy fats on your ketogenic diet will help to increase your energy levels, increase your mental clarity, and encourage healthy weight loss!
This Classic Chocolate Cake is the best and the only chocolate cake recipe you'll ever need! It has tall layers of soft, airy chocolate cake
This Classic Chocolate Cake is the best and the only chocolate cake recipe you'll ever need! It has tall layers of soft, airy chocolate cake
INGREDIENTS
Extra butter and cocoa powder and parchment paper for the pans
½ cup boiling water
2.6 oz Dutch cocoa powder ¾ cup
1 cup chilled buttermilk
2 tsp white vinegar
1 tbsp vanilla extract
10.5 oz AP flour 2 ½ cup AP flour
1 tsp baking powder
1 tsp baking soda
10 oz unsalted butter softened (2 ½ sticks)
1 lb white sugar 2 ¼ cups
½ tsp kosher salt a heaped ½ tsp
4 large eggs
INSTRUCTIONS
Line the bottom of three 8 inch cake pans with parchment paper (using some butter to stick the paper to the bottom). Brush/rub the sides of the pan with butter as well. Dust the sides of the cake pans with Dutch cocoa powder as well. Set aside.
Preheat the oven to 325°F (160-165°C).
Have all the ingredients measured and ready to go.
Place the hot water and cocoa powder in a jug and whisk to dissolve the cocoa powder in the water. You should have a thick and smooth paste. Stir in the buttermilk, vinegar and vanilla, and set aside.
Sift the flour, baking powder and baking soda together into a bowl. Set aside.
Place the butter in the bowl of your mixer. Using the paddle attachment, beat the butter until it’s light and fluffy, at medium speed for about 2 - 3 minutes.
Add the sugar and salt into the mix, and mix for a further 4 - 5 minutes until light and fluffy. Remember to scrape down the sides and the bottom to make sure that the sugar is well incorporated. Beat the butter and sugar mix further if needed (until light and fluffy).
Mix in the eggs, one at a time, about 20 - 30 seconds per egg. After adding 2 eggs, stop the mixer and scrape down the sides and bottom. Start the mixer again and add the final 2 eggs. Once the final egg has been whisked well into the batter, stop the mixer and remove the bowl.
The chocolate milk and flour will be mixed in by hand with a spatula, but can be done in the mixer as well (see recipe notes).
Add a generous ⅓ of the flour mix and fold it into the batter using a spatula. When the flour is mixed in half way (with some white streaks visible in the batter), add ½ of the chocolate milk mixture into the batter.
Using a spatula, fold in the chocolate mixture until it’s mixed in half way (with dark chocolate streaks now visible in the batter).
Next, add another generous ⅓ of the flour mix and fold it into the batter using the spatula.
When the flour is almost completely mixed in (some white streaks are OK at this stage), add the final bit of the chocolate milk. Fold in until almost fully mixed in (some dark chocolate streaks are also OK at this stage).
Add the final bit of flour, and fold it into the batter until it’s all FULLY incorporated. You should now have a smooth chocolate cake batter, free of lumps and white flour streaks.
Pour the batter into the prepared cake pans - about 18.7 oz (530 g) per pan. Mix and fold the batter before measuring it into each pan.
Transfer the pans into the preheated oven. Make sure the pans are not touching each other in the oven if possible (see recipe notes).
The total bake time for the cakes is between 25 - 30 minutes, but make sure to rotate the cake pan once, half way through. The cakes will be done when they are springy to the touch in the center, and the sides are just starting to pull away from the sides of the pan. A clean toothpick inserted into the middle of the cake should come out clean at this point.
Remove the cake pans from the oven and allow them to cool for about 10-15 minutes, until the cake pans can be handled.
Carefully flip the cakes out of the pan, and place them on a cooling rack (parchment side down), until they're completely cooled down. If you won’t be frosting the cake immediately, cover the cake layers with plastic wrap and store in the fridge.
London is my favorite city in the world. There is just so much to do and see, it’s impossible to get bored of this city.
Also, because I love all things #aesthetic, I have been trying to find the cutest cafes London has to offer.
And let me tell you, they DO NOT disappoint.
Some of these places are the most instagrammable spots in London and you’ve probably seen a couple on your feed.
TRAVEL HACK: Download the Skyscanner app and set up alerts to any city in the world. I have about 30 different alerts set up at a time and whenever a price drops I get notified. Thanks to Skyscanner I booked a roundtrip ticket from Miami to London (no layovers) for less than $350, when the regular price was over $600!!
Cute Cafes In London
Whatever your personal style is, whether you’re looking for cute-sy or cool cafe spots in London, there’s something here for everyone.
Here are the 10 Best Cafes in London to spend an afternoon chatting up with a friend.
…
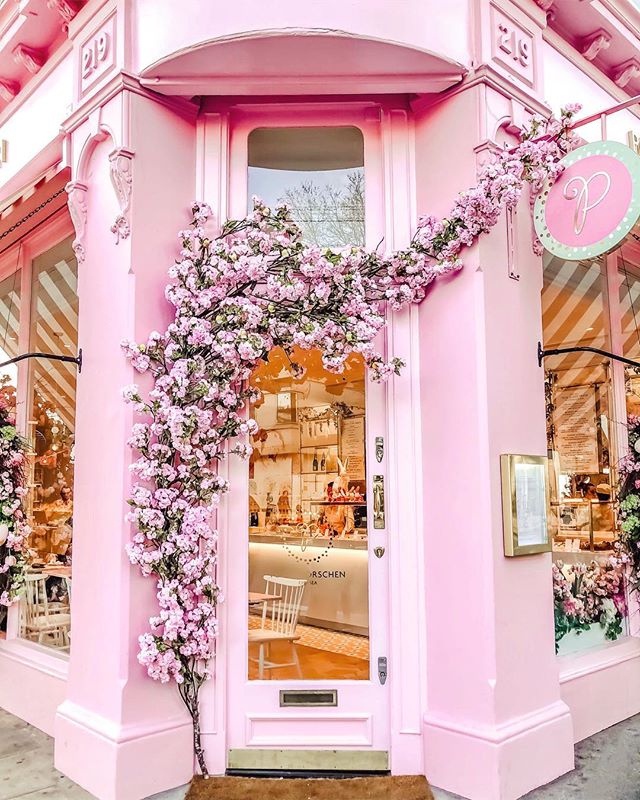
Peggy Porschen Cake Shop
Quite possibly the most instagrammed cafe spot in London, Peggy Porshen is beautiful inside and out.
Add to that the delicious pastries, pretty cakes and coffee; you’ll think you died and went to heaven.
Peggy Porshen is quite possibly one of the most beautiful coffee shops London has to offer.
…
Biscuiteers
Biscuiteers offers hand-iced biscuits in a variety of shapes and sizes. No two biscuits are the same.
Moreover you can have afternoon tea or perhaps even book an icing lesson and learn a new skill.
…
The Ivy Chelsea Garden
The Ivy Chelsea Garden is an absolute must see. Stop by for just a cup of coffee or a full on brunch.
This place is a plant lovers mecca. Tucked away in the back of the building is a garden and terrace that offers a getaway from the hustle and bustle of Kings Road.
…
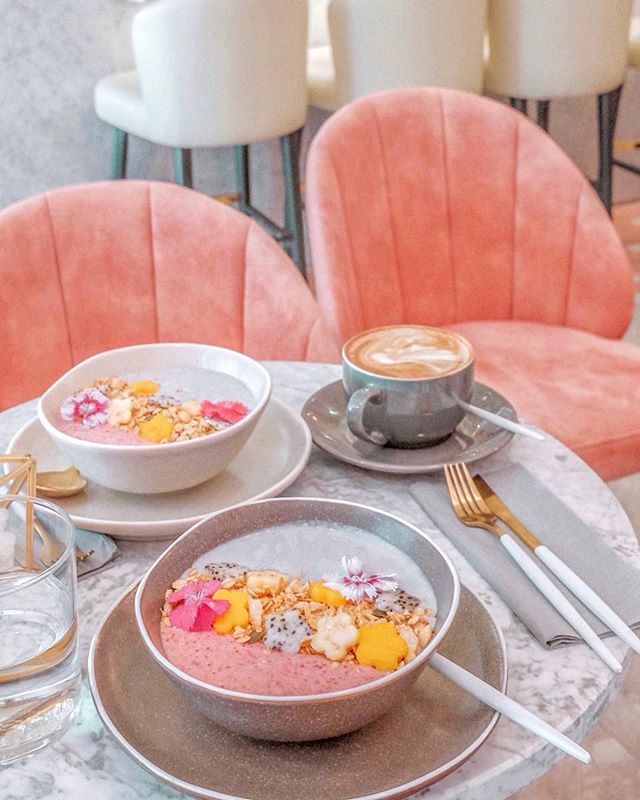
Feya
Feya offers all day brunch, coffee, and dessert. This is an elegant coffee shop with remarkable service.
Beautiful ambiance and the presentation of the desserts is exquisite. You’ll find yourself taking many (many!) pictures here.
…
Maitre Choux
A chic and stylish pastry shop that tastes just as lovely as it looks.
This is one of the pricier coffee shops in London, but it is quite an experience for you taste buds. Worth the visit.
…
Aubaine Selfridges
This unique spot offers all day dining and freshly baked pastries. They even offer an afternoon tea with scones, pecan brownies, and raspberry tart. Finger foods also available if you’re craving something savory.
The hanging florals make this place a real jewel. It’s a little french heaven in busy London.
…
GAILS Bakery
GAIL is a no fuss coffee shop that offers a wide variety of pastries with minimal ingredients.
They’re located all over London, stop by and grab yourself a cinnamon bun. They even offer vegan pastries!
…
Duck & Waffle
Breakfast and coffee with one of the greatest views of London. This is a first-timers must see.
Duck & Waffle is open 24 hours, so if you’re craving a waffle at 2am (who isn’t?!) you can go and treat yourself.
…
AIDA Shoreditch
Two word. Rose. Lattes. This is actually half a Scandinavian clothing shop with beautiful pieces and half a coffee shop.
One of the cutest little spots in all of London.
…
The Locals Cafe
The aesthetics in this place is just WOW. From the food to the decor, everything in The Locals Cafe is simply stunning.
They have a wide variety of brunch options, even matcha pancakes are on the menu!
…
Don’t forget:
Download the Skyscanner app and set up alerts to any city in the world. Be the first to know when a price drops!
Eating a snack between meals helps curb your hunger so that you don’t inhale your dinner when you finally sit down to eat a meal. Snacking can also help you get in all the nutrients you need. On the flip side, grazing all day—particularly on foods with little nutritional value—may result in eating too much and packing on extra pounds. These 10 snacks are smart choices that can help you lose weight.
Find out which 10 healthy snack foods can help you lose weight.
1. Almonds
People who chewed almonds thoroughly (up to 40 chews) felt full longer than those who chewed the same amount of nuts fewer times. Plus, almonds deliver filling fibre, protein and healthy fats.
You don’t need to go on a grapefruit diet to reap the health benefits of this ruby fruit. Eating grapefruit with each meal, means you can lose up to 3 1/2 pounds over three months. Grapefruit may help manage appetite by lowering insulin levels.
3. Chickpeas
Keep chickpeas in the pantry. They have a meaty texture and a nutty flavor along with plenty of satiating fibre and a little protein—perfect when you’re watching your weight. Try roasting them for a crunchy snack that packs up easily.
4. Grapes
Toss grapes in the freezer for an easy snack. Because they’re sweet and you savour them individually and slowly, you’ll get a lot of satisfaction for just a handful of calories.
5. Chocolate
Losing weight doesn’t mean giving up the foods you love. Believe it or not, giving yourself little treats may be the secret to losing weight—for good. Aiming to be “too good” sets you up to fail. If you like a glass of wine with dinner, make room for it. Prefer dessert? Skip the drink and go for a small chocolate treat instead.
Popcorn is high in fibre, low in fat and delivers some protein. A 1-ounce serving (about 3 cups) of air-popped popcorn has 4 grams of fibre, almost 4 grams of protein, just over 1 gram of fat and clocks in at 110 calories. This combination makes it a snack with staying power.
7. Yogurt
Use snacks to fill nutritional gaps. Make your snacks count. Choose those that provide calcium and fibre—two nutrients that people often skimp on. Yogurt with fruit delivers calcium and fibre, plus protein and gut-healthy pro-biotics.
8. Hummus
Skip the vending machine and satisfy the afternoon “munchies” with a healthy snack you packed at home. You’ll save money and get a bigger bang for your nutritional buck. Try cut up veggies and some hummus. Planning snacks that provide both carbohydrates and protein will help tide you over until dinner.
9. Oatmeal
Oatmeal is a complex carb, meaning it helps fill you up without spiking your blood sugar. Plus, it’s a good source of fibre and eating more fibre helps people lose weight and keep it off. While we think of it typically as breakfast, a small bowl of oats makes a hearty, filling and delicious snack. To make this snack more convenient—keep a packet or two of unsweetened instant oatmeal at your desk or make overnight oats in a mason jar.
Dried fruit is a portable, healthy snack. Eating fruit helps with weight-loss because it’s packed with filling fibre (and important vitamins and minerals). Look for fruit with no sugar or sweeteners added and pair dried fruit with nuts for a snack with a balance of healthy carbs and protein.
It is a beautiful day here with a definite touch of fall in the air. I have lots of photos to share with you but I got a new computer and my photos have not been transferred yet
so I hope you will enjoy another cup of tea with me with some of our garden roses.
I love this teacup from Winners-it seems to speak of autumn to me.It is a Rose Cameo Peach by Royal Albert.
The roses are a David Austen English rose - Golden Celebration.
Have an oatmeal scone with some of my peach preserves. This is one
of my favorite things-as good as a dessert and healthier.
The tea set is Wild Rose by Skye Mc Ghie
Hopefully, I get my computer all up and running soon and can share more with you soon. In the meantime I am looking forward to our annual 70 mile yard sale this Saturday - hoping for a nice day and some pretty treasures to take home.
Thank you for your visit and welcome to my new followers.
Préparer la pâte en mélangeant la farine et le beurre avec le batteur K jusqu'à obtention d'une consistance sablée. Ajouter ensuite l'oeuf et mélanger pour obtenir une boule. Réserver 30 minutes.
Mélanger au fouet ballon la farine, les sucres. Ajouter ensuite le fromage blanc, la crème épaisse, le lait et les jaunes d'oeufs.
Battre les blancs en neige avec le fouet ballon.
Mélanger ensemble les blancs en neige et la préparation au fromage blanc.
Garnir avec la pâte un moule à manqué de 28 cm de diamètre sur 6 cm de haut. Y déposer le mélange qui doit arriver jusqu'au bord du moule (mais c'est normal).
La cuisson se fait en 2 temps 30 minutes à 180°C puis 60 minutes à 155°C
A la sortie du four, retourner la tarte sur une grille et laisser refroidir.
Saupoudrer de sucre glace ou de cannelle, selon votre goût.
Sweet & Saucy Shop specializes in custom desserts that taste as good as they look. We do everything from gorgeous custom designed wedding cakes to large mini dessert bars, favors, & cupcakes!
location/serving Long Beach, CA / Southern California
Melody's cakes are fancy and stylish, with just the right bit of quirkiness thrown in. We love her adventurous spirit and the attention to detail that she pays to each and every sweet that comes out of her oven.
Sweet & Salty Holiday Toffee turns a saltine into a dessert. It's the easiest holiday dessert to throw together for a no-stress and no-bake treat.
Editor's Note: The recipe title for this dish was changed on July 9, 2020.
Preheat oven to 350°. Line a baking sheet or jelly-roll pan with tin foil and coat with cooking spray. Line the baking sheet with Saltine crackers. Set aside.
In a medium-sized saucepan, melt butter and brown sugar. Bring to a boil, stirring continuously, and let cook until bubbling, about 2 minutes. Pour mixture over crackers in an even layer and bake 12 to 15 minutes.
Top immediately with chocolate chips and let melt. Smooth chocolate out into an even layer, then top with red and green M&Ms and holiday sprinkles. Cut into squares, then cool until the chocolate has hardened.
This content is created and maintained by a third party, and imported onto this page to help users provide their email addresses. You may be able to find more information about this and similar content at piano.io
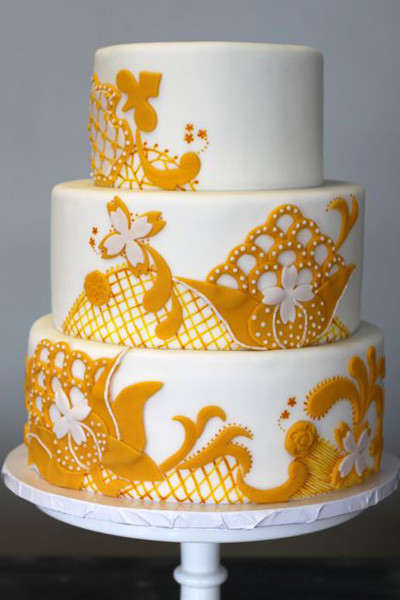
Branco Prata four tiered deep golden yellow frosted wedding cake with floral display
What is it about that inspires some of the most beautiful—and delicious—? We may never know for certain, but we do know we love the results: Unforgettable wedding cakes that we just can't get enough of. Of course, every season has motifs and themes that are virtually guaranteed to enhance the look of a confection, but as far as dynamic combinations go, summer—with its bright, and —and a wedding cake are the ultimate match.
Don't just take our word for it. We'll let the following big-day desserts, which were served at couples' seasonal celebrations, do the talking. These incredible desserts prove that there's no single way to pay homage to the , especially when it comes to cake. Whether you top a neutral treat with (think: garden roses, ranunculus, and hydrangeas) or opt for of your favorite tropical leaves (such as monstera and palm), floral accents are always an option. They'll also help lighten a confection with a moodier color scheme so that you can have the best of both worlds. Not feeling those fresh flower details? Check out the upcoming , citrus-covered, and honeycomb cakes, or else decorate your confection with seasonal colors like pinks, oranges, and yellows. This dessert used all three hues for a result that epitomizes the hallmarks of summer.
To inspire your future warm-weather treat, we've rounded up a selection of summertime wedding cakes, perfect for any type of seasonal wedding—from a in a ballroom to an al fresco garden party, and everything in between.
Make the crust: Preheat the oven to 350 degrees F. Mix graham cracker crumbs, melted butter, and 1/2 cup sugar together and press mixture into the bottom of a 9"-x-9" glass baking dish. Bake for 15 minutes. Allow to cool.
Make the cheesecake layer: In the bowl of an electric mixer, beat cream cheese and 1/4 cup sugar until light and fluffy, about 2 minutes. Slowly add in 2 cups heavy cream and beat until stiff peaks form.
Make the strawberry pudding layer: In another medium bowl, beat milk, pudding mix, strawberry yogurt and about 3 tablespoons strawberries until combined. (Start with 1 1/2 cups milk and beat until it’s about pudding consistency. If it’s too thick, add a little more milk.) Set aside the remaining strawberries for the topping.
Make the whipped cream: Beat heavy cream and sugar in a third bowl until stiff peaks form, 2 to 3 minutes.
Assemble: Pour cheesecake layer on top of cooled crust, spreading evenly, then repeat with strawberry pudding layer. Top with whipped cream, spreading evenly, and garnish with remaining strawberries.
This content is created and maintained by a third party, and imported onto this page to help users provide their email addresses. You may be able to find more information about this and similar content at piano.io
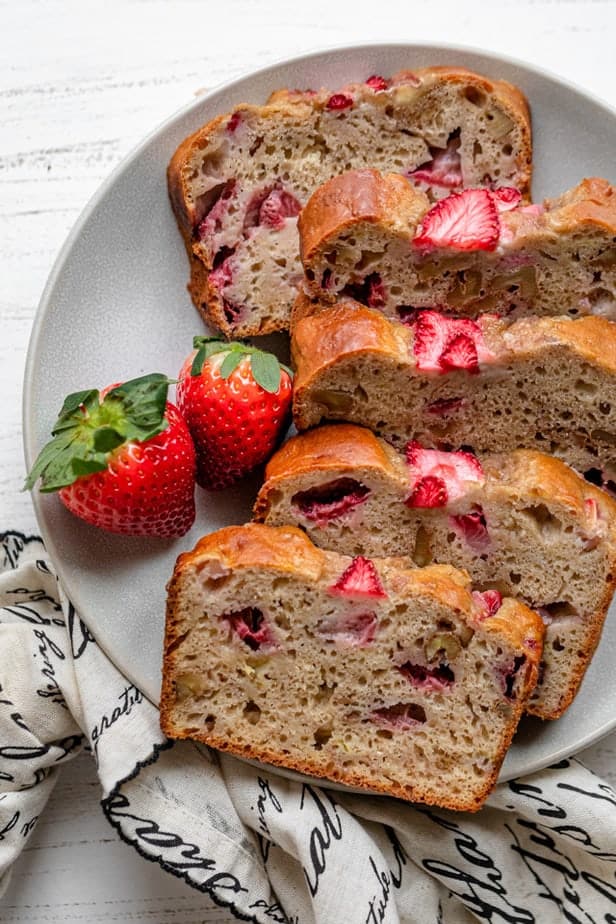
This Strawberry Banana Bread is a great quick bread recipe made without any oil or butter and a moderate amount of sugar. It’s like your favorite moist, rich banana bread, but low in fat and loaded with fresh strawberries! I make it using greek yogurt instead of oil, so it gives the bread moisture without the saturated fat.
If you’re in the mood for a little twist on banana bread, this strawberry banana bread is a great one to try! It’s very quick to put together, easy to prepare by hand without needing any mixer, and makes for a great treat that’s only about 125 calories per slice!
How to make strawberry banana bread
Mix the dry ingredients together: Flour, cinnamon, baking powder, baking soda and salt.
Mix the wet ingredients together: eggs, sugar, Greek yogurt and mashed bananas. You can substitute the Greek yogurt for oil or for sour cream. You can also reduce the sugar to 1/4 cup or omit it all together.
Now the process for this strawberry banana bread is similar to all quick bread recipes.
Transfer the dry ingredients on top of the wet ingredients.
Mix the ingredients together until well blended, but be careful not to over-mix.
Add the chopped strawberries and walnuts on top. It helps if you can toss the strawberries in flour to avoid them sinking to the bottom of the batter, but it’s not necessary.
Fold the strawberries and walnuts into the battery gently and transfer it to a greased loaf pan or one lined with parchment paper. Then bake in the preheated oven for about one hour.
You’ll know it’s done baking when the banana bread starts to pull away from the loaf pan and the top is golden brown. The ultimate test is to stick a toothpick in the center of the bread to see if it comes out clean. Allow the bread to rest for at least 10 minutes before removing it from the loaf pan. Then slice it up and enjoy!
Tips for making strawberry banana bread
Use frozen strawberries if you don’t have fresh ones. Make sure to thaw them beforehand. Also, you will need to compensate for the added moisture from frozen strawberries by adding 1-2 extra tablespoons of flour.
Toss the strawberries in some flour before folding them into the batter. This step is not necessary, but it will help distribute the strawberries all over the the banana bread so they don’t sink to the bottom.
Tent the loaf pan with foil during the last 10 minutes of baking if necessary. The bake time is between 50 and 60 minutes. However, sometimes at around 50 minutes the top of the bread will be golden brown but the center won’t be cooked through yet. The tenting tip helps to prevent the top from burning while baking the bread through.
Try it with blueberries or raspberries, or mixed berries. It works the same way and adds great color to the banana bread recipe.
Frequently asked questions
How do you know when the bread is baked?
The strawberry banana bread will take around 50-60 minutes to make, and it’s best to check for doneness at around 50 minutes. The loaf will be golden brown in color and when a toothpick inserted near the center comes out clean.
How long does strawberry banana bread keep?
Once the bread has cooled, store it in an airtight container and it will be good for around 4 days. You can also freeze the bread, wrap it tightly in foil and place in a freezer bag.
This is such a great banana bread recipe that you can make for your friends and family to enjoy as a snack, for dessert or even from breakfast with a glass of milk. It’s moist, sweet and easy to prepare and everyone’s going to love it!
If you’ve tried this healthy-ish feel good Strawberry Banana Bread recipe or any other recipe on FeelGoodFoodie, then don’t forget to rate the recipe and leave me a comment below! I would love to hear about your experience making it. And if you snapped some shots of it, share it with me on Instagram so I can repost on my stories!
This Strawberry Banana Bread was originally published on October 15, 2016. I’ve updated the recipe slightly and re-sharing it with more step-by-step photos and a video tutorial. Here’s the original photo!
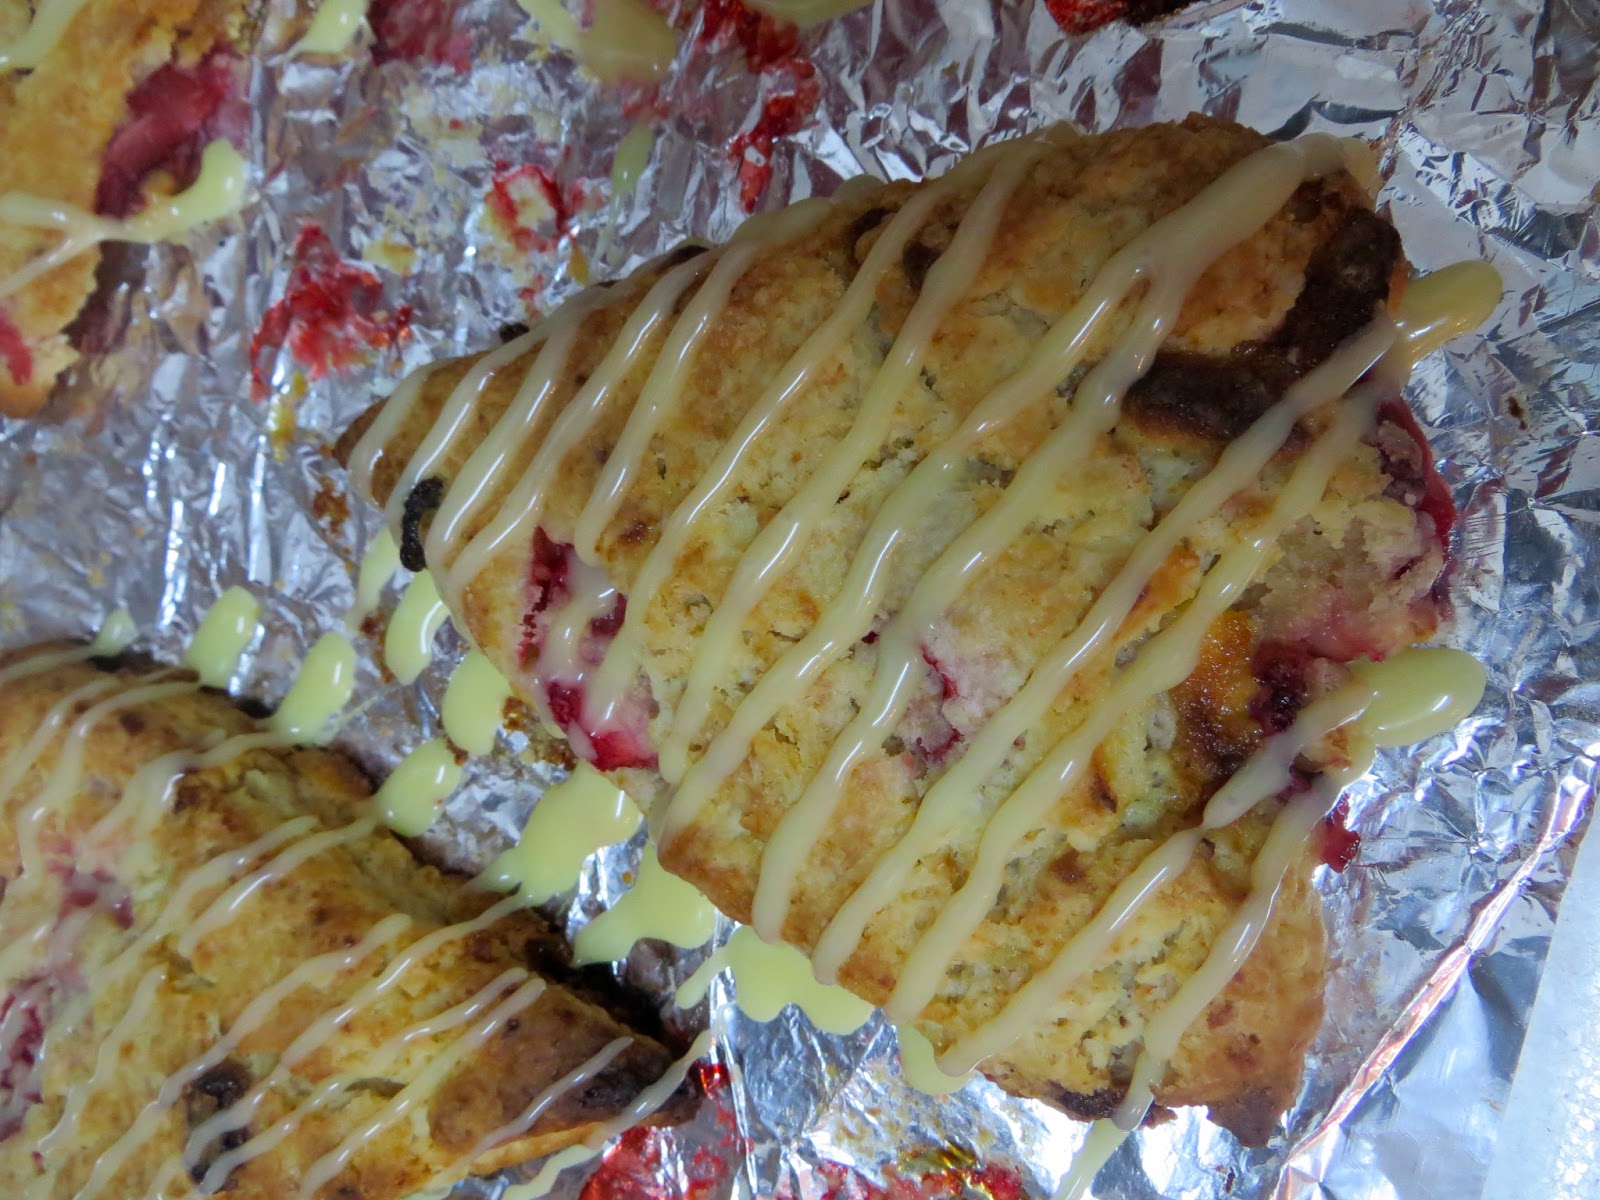
These guys are really tasty. Like extremely suprisingly delicious.
I have never been one for strawberry-flavored things. I LOVE the berry. Fresh sweet strawberries are absolutely amazing!
But I can't deal with strawberry ice cream, or pie (unless it has rhubarb to sour it up a bit), or strawberry jam.
My mom used to give us cut up strawberries for dessert growing up, and she'd sprinkle a little sugar on them so they'd get a little syrup going...my siblings were obsessed! I always asked for them sans sugar. I just never liked overly sweet things in one bite.
These guys however...they've changed my mind about baking with strawberries. And white chocolate. That's one of the best things about the Chocolate Blog Party. I try new things I never would've known I'd like. And it's so fun!
The recipe comes from one of my favorite bloggers, Smitten Kitchen. She made them as biscuits, and I found that my batter came out more scone-like as I made a few adjustments.
They were the perfect way for me to unwind this afternoon after knocking my first final exam and a presentation out of the way. The semester is winding down, and I'm getting nervous, excited and sad all in the same time!
I hate to say goodbye to my wonderful San Sebastián (literally in looove with this city) and all of the fantastic friends I've made, but I'm also unbelievably excited for my summer travels! Definitely full of mixed emotions as it finally sets in...I have a little over a week left before I pack up and start travels. Eep. Just have to survive 2 more final exams and a paper!
These scones most definitely have aided in the emotional roller-coaster that are these realizations of leaving! Baking always makes me feel better! :D
So here we go:
2 cups flour
1 tbsp baking powder
1/4 cup sugar
1/2 tsp salt
85 grams COLD unsalted butter (cubed)
1 cup chopped strawberries (the riper the better)
3/4 cup chopped white chocolate
(plus a few tablespoons chocolate to melt and drizzle on top when baked)
3/4 cup heavy cream (plus 2 tsp to use to melt white chocolate)
Preheat your oven to 425 degrees and line a baking sheet with parchment or foil.
In a large bowl, whisk together the dry ingredients. Then cut the butter in with a pastry cutter, or 2 knives until only pea-sized lumps remain.
Then fold in the strawberries and chocolate with a rubber spatula until the berries are coated in the flour. Then pour in the heavy cream, and gently stir to distribute.
Once the cream has mostly absorbed, use your hands to knead the dough in the bowl GENTLY, to get all of it in a ball. Be sure to not overwork the dough, not everything needs to be mixed entirely! Pour out onto a well floured surface, and sprinkle top with flour. Gently press the dough until its down to 3/4 inch thickness, and in the shape of a circle.
Using a large, floured chef's knife, cut the circle into 8 even wedges.
Place on the baking sheet giving each scone a couple inches to grow, and bake for 12-15 minutes. Once they have cooled, microwave the extra white chocolate and a little bit of cream until melted. Using a ziploc or a pastry cone decorate with zig zags or stripes of chocolate.
And there ya go! If you've made scones before, definitely a super easy recipe! If this is your first time, still a fairly manageable dough to work with. :) And ohhh so yummy when they come out. Now to look towards surviving my 3rd to last finals week. EVER. How crazy is that??!
Here's the rules of the game for the Chocolate Blog Party: